Sunday, September 30, 2012

Making Old Jewelry New Again

Whenever I pop into a thrift store or a flea market, I always take a few minutes to browse through the jewelry.  You never know what you'll find there!  I once picked up a garnet necklace for $5.00.  I brought it home, restrung it and added a chunky garnet, pearl and silver pendant, and it looked totally different (and way more expensive!). 

My sister Gina sent me some necklaces that she found that needed some lovin'.  I forgot to take the 'before' photos, but I did get some great 'after' pics, which I'll share with you!


The first two necklaces were pretty straighfoward...
both had wonky seed beads in between each of the designer beads, and they looked a bit dated.

With the red necklace, I replaced the wonky beads with  smaller, darker red seed beads (size 11).  From a short distance, it looks like the necklace is knotted between each bead.  At first glance, I thought these beads were Chinese cinnabar, but they are actually German or Czech glass.  They have a great carved texture to them.

The second necklace also is made of glass beads.  They are white with an red-orange swirl design in them.  The original was separated by white wonky seed beads, but I replaced them with Swarvoski crystal 4 mm bicones in Fire Opal.  There are shades of red, orange and dark gold in each bead, which brings out the color of the original beads.

The third necklace is a 'found item' necklace, for lack of a better term.  Gina had found an old MGM Grand Hotel key from Las Vegas.  It's pretty cool -- it has the MGM lion embossed on the front.  She asked me to make that the center pendant on a necklace with other charms and beads. 

I added some bling to the key first, though.  I took a short piece of rhinestone chain and used E-6000 glue to adhere it to the length of the key.  Hunting for the other charms and beads in my stash was a challenge.  I ended up mixing the metals...you'll see brass (the color of the key) as well as silver, copper and a touch of gold.  I kept the beads in shades of bronze and green as much as possible.  A pair of dice beads next to the key was a nod to the Vegas story. 


The final piece I worked on for Gina was this 1940's style clear glass necklace (below).  This one took a little more time.  Each bead is on an eye pin, attached to the next bead, to create a chain of beads, and I replaced every eye pin.  The original necklace had two metal bicone beads that were showing a great deal of wear, and Gina wanted them removed.  I substituted 8 mm Swarovski crystal bicones in Sapphire blue.  I hope she doesn't mind that I added color to the necklace, but I think the Swarovski really pops. 

I'm still looking for one more finding for this piece...the large crystal-cut pendant at the center has an old bail that is a bit worn.  I may have to special order a gold-filled bail to replace it, if I can find one. 

I could see a bride wearing this necklace, as something "old, borrowed and blue." 

So, three 'old' necklaces re-made, and a new one created.  Not too back for 'found' jewelry.  I think all together I may have spent about $20 for the materials and Swarovski crystals.  I enjoy re-creating something out of old beads and found objects...I'll have another post soon about a fun way to use old religious medals.  Keep tuned!  Till next time... Renee

Friday, September 28, 2012

It's Nearly Time for 'Trick or Treating!'

Halloween is one of my favorite holidays!  This may be in part to the fact that I have four kids, and I like to sew...we have had a ball, making costumes and decorations over the years.  I'll dig through my photos and post some soon. 

I also make Halloween cards to send to all of my friends, and especially my dad, who's birthday is October 31. 

All week, Viva Las Vegas Stamps has been having a 'blog hop,' where the design team members show off the latest Halloween stamps and what you can make with them.  Check it out here http://vivalas.blogspot.com/2012/09/all-hallows-eve-party-day-6.html

They invited viewers to post a Halloween card, and I'm always up for a challenge, so here's mine:


I used black Staz-on ink to stamp the 'monster' (I think it's Herman Munster) into ivory sculpey clay, and cut around it carefully with an exacto knife.  I baked the clay according to the manufacturers directions.  It's very tactile...you can feel the embossed image in the hardened clay.  The only caution to making a clay tile like this...you should use a thin piece of packing foam (like the stuff that comes wrapped around electronics) over the top of the card to keep it from breaking or damaging the envelope. 
 
Both stamps are from Viva Las Vegas Stamps.  I got them in a one pound grab bag about 6 years ago.
 
I have a few ideas about this year's Halloween card...check back later to see how they turn out!
 
Keep stamping!
--Renee

Monday, September 24, 2012

Jelly Making 101

The weather has cooled, and I needed to stay close to home today, so I decided it was the perfect time to make jelly!

My favorite kind of jelly is black raspberry.  It's nearly impossible to find in a grocery...once in a while you may see black raspberry jam, but to me, it's just not the same. 

Black raspberries have a very short season.  I live near Philadelphia, and in this zone, we have about a three-week window around July 4th to pick the berries.  Highland Orchards near West Chester, Pa.,  (www.highlandorchards.net) has several rows, and I've had good luck filling my trays there.  Black raspberries have thorns, so you can get a little scratched up if you don't wear long sleeves.  They aren't cheap, but the end product is worth it! 
 
Don't they look delicious?!

After picking, I bring the berries home and juice them right away to get the freshest flavor.  I have this juicing pan called the Meju-Mahu.  I don't think they sell them in the States anymore, but perhaps one could be found online?  It is like a triple-boiler...there is a pan at the bottom for water, then a pan that sits on top of that to collect the juice, and then a large pan with a colander insert for the fruit that sits on top of the juice pan.  A lid covers it all.  The steam from the bottom pan releases the juice from the berries, and all that's left after about a half hour of steaming is the pulp and seeds. 
 
I usually freeze the juice in plastic containers, because it's just too hot to make jelly in the summer!  When my supply of jelly from last year is getting low, I'll get a couple of containers of juice out of the freezer and get to work. 
 
 Two batches made 13 half-pint jars, plus one 4 oz. jar.
 
Having done this for several years, I kinda have it down to an assembly line production.
 
1.   I wash the jars and put them in a large baking dish; I pour boiling water over them to keep them hot. 
2.  In another pan of boiling water, I put the new lids and rings. 
3.  Three cups of  berry juice, 1/4 cup of lemon juice and 5 cups of sugar go into my largest pot over high heat, and I stand and stir it constantly until it boils.  Then I add Certo (a liquid fruit pectin), return the jelly to a boil for one minute, and then remove it from the heat. 
4.  Working quickly, I ladle the jelly into the jars, wipe the lip of the jars clean, put on a lid and close each jar with the ring.  
 
Most recipes will tell you that you must process the jelly in a hot-water canner for a few minutes, but I don't.  I just put my jars on a cutting board, and allow them to cool.  As they do, a vacuum is created inside the jar, and you hear the lid 'pop' loudly as it seals.  I check each jar after about 2 hours, just to be sure they all have sealed properly.  If one hasn't, I pop it into the refrigerator and use it within the next couple of weeks.  My mom made jelly for years and never processed it in a hot-water canner.  I guess old habits die hard.  Another thing I never do -- double the recipe!  I'm afraid that it won't jell properly, so after the first 7 jars were done, I washed the pans and started a new batch. 
 
Some of this will be given as gifts...but most of it will be spread on piping hot home-made biscuits.  Yum!


Friday, September 21, 2012

Pearl Knotting Class in November

When I was pregnant for the third time (!), I took my first jewelry making class through G Street Fabrics outside of Washington, D.C., and learned how to create a knotted necklace.  The class project was an 18 inch strand of rose quartz, which is funny to me now because I never wear pink.  It has long since been cut apart and the beads used for something else, but I have continued to knot semi-precious stones and pearls for the past 20 years.

I teach at The Bead Garden, a sweet little bead shop in Havertown, Pennsylvania, and do most of the re-knotting repair work.  Last week, a woman brought in this necklace, which had broken, for re-stringing. 
 
 
It is made of the most beautiful dark grey fresh water pearls, graduated in size from about 8 mm to about 16 mm.  This photo just doesn't do it justice.
 
Start to finish, the repair took about 20 minutes.  Knotting beads isn't hard, there are just a few little techniques that make the job go easier.  Over the years, I've taught at least 100 people how to create a knotted necklace. 
 
If you live in the Philadelphia area, and you're interested in learing how in person, I'm teaching at the Bead Garden on Thursday, November 8, from 6 - 8:30 p.m.  You can register online through the website http://www.thebeadgarden.com/classes.htm

For those of you who don't live nearby, I'll try to post a video tutorial soon.

More jewelry designs are coming soon -- check in with me again!
 

Tuesday, September 18, 2012

Childhood Revisited


Would you believe that toys you played with as a child are 'collectible' now?  I spent the past two days following several items on e-bay, hoping to win one and reclaim a bit of my past.  Let me explain...

The other day, I was moving things around in my attic, and came across a shoebox full of little things.  Low and behold, there was a small cardboard 'dresser' of three drawers filled with doll clothes and accessories that I once played with. 

When I was about seven, my mother went to an estate auction, and came home with a (very old) hand-crafted dollhouse for me.  I was thrilled!  She painted it and helped me find some furniture that would fit inside.  It wasn't big enough Barbie, but another toy company had just come out with Dawn dolls -- a 6.5" fashion doll that was designed to compete with Barbie.  Soon I had Dawn and about 6 of her friends, plus clothes and accessories.  My friends and I spent hours playing with the dolls and the dollhouse. 
Dawn and her friends

I still have the dollhouse, but it has been re-purposed. 


It sits on the counter in our basement and holds the cable box, DVD player, game console, DVDs and videos, and all of my old record albums.  It needs a little updating -- a paint job or some new interior wallpaper, but it is still sturdy.  It is well over 100 years old. 

Well, my attic find of doll shoes, clothing and accessories motivated me to look on ebay to see if I could find a Dawn doll (I guess my mother got rid of mine after I left for college).  What a surprise!  Mint condition Dawn, in the box, is starting for the high $20s.  An odd lot of Dawn and her friends, with clothing and some accessories, was listed at a 'buy it now' price of $250!!

Dawn hasn't aged well...I guess the science of toy making has advanced in the past 40 years.  Many of the dolls have green around the knees (from the wire in her leg that allowed it to pose), and some have 'melted' body parts, or holes in the back of the legs from the manufacturing process.  Those issues didn't sway me from wanting at least one doll.  After two days of watching and being outbid a few times, I got smart and waited to place a bid within the last hour of the auction, and only for a doll that no one else had bid on yet. 

My strategy paid off, and I'm now the proud owner of three dolls!  Someday, when I have granddaughters, I'll re-purposed that doll house again, and we'll have lots of fun playing with it once more! 

Hope you didn't mind my trip down memory lane...just think twice before you throw or give away the iconic toys your children played with...in 30 years, they'll be worth more than you can imagine!

--Renee

Sunday, September 16, 2012

Viva Las Vegas Design Team Submission

One of my goals for this blog was to create a submission for the Viva Las Vegas Rubber Stamps design team.  I have several stamps by this company in my stash, and I search their website (and order) several times a year, especially when I'm looking for just the right image or saying to complete a project. 

Here are a few examples of the artwork I've created using their images.

A St. Patrick's Day Card - I like to send cards on the unusual holidays, and what's more Irish than a good beer shared with good friends?
 

Be My Valentine -- I did a series of Valentine's Day cards, using this dog stamp colored in a variety of breeds (think golden retriever, dalmation, hound dog) and changed the sentiment with each one.  I have two little dogs -- a sheltie and a toy poodle, and Viva Las Vegas had stamps of each breed.  I have used them on other cards. 


Desert ATC -- This ATC (artist trading card) was made for a swap.  The theme was 'books you've read,' and I had just finished reading a Tony Hillerman novel "A Thief of Time."  The story was about an anthropologist who studies ancient Anasazi pottery.  She disappears, and the Navajo Tribal Police must discover why. I stamped this scene on 150 (very fine) grit sandpaper, and colored it with Twinkling H2O paints.  It has a great texture and the paint sparkles, mimicing the sun reflecting off the desert sand.

 
Travel America ATC --  This ATC was for another swap with a 'Travel the USA' theme.  What is more iconic than Route 66?  A diner along the way, with a vast deserted highway, reminds me of the many trips my family took in the late 60's.  "Are we there yet?"


Totally Tangled Alice -- Another ATC, this one with a twist.  The theme was 'Alice in Wonderland,' but I didn't want to do something so literal.  I had just started playing around with Zentangles, a method of artwork that encourages repetitive design, and decided to try it out with my Alice stamp.  I was able to find examples of things she may have found in wonderland...the heart, with cat-like stripes, and the large flower come to mind.  I made 12 of these ATC's, and each one was a little bit different.  For more on Zentangles, check out this website: http://www.zentangle.com/

 
So this gives you a little taste of the kind of stamping that I do.  I tend to go for funny or scenic stamping, rather than 'cute,' but then every once in a while, I'll see an image that will motivate me to try something new.  Till next time, happy stamping!
 

Friday, September 14, 2012

More on Scenic Stamping and Masking

In my last post, I outlined the basics of rubber stamp masking to create a scene.  One of the toughest things when you try this technique for the first time is determining which image needs to be stamped and masked first. 
 
To give a scene depth, one (or more) image should be in the foreground, and others make up the background.  As the artist, you get to decide which images go where.
 
To show you the difference, I picked two stamps from my stash -- a window and a person. 
 

I stamped both on a post-in note to make a mask, and trimmed them carefully with scissors. I cut the inside of the window out with an exacto knife.  I stamped the lady first, covered her with the mask, and stamped the window over top. 
 
By stamping the lady first (and masking her), the window appears in the background.  Now, here's how the scene looks when I stamp the window first, mask it, and stamp the lady inside. 
 
Now the lady is in the background, and the window is in the foreground.  Did you notice that the woman's sunglasses and shopping bag are gone?  Actually, they were stamped on the mask, which brings up another point --  if you work carefully, you can use masks to cover part of an image you don't want to appear in your scene.  The stamp positioner (mentioned in my last post) really comes in handy for that trick.
 
So, if you're intrigued enough to try scenic stamping, the best advice I can give is to make a mask for each image you plan to use in the scene and play with them a bit to find the right perspective. 
 
For some terrific examples (and plenty of inspiration), check out the cover art of Rubber Stamp Madness Magazine by clicking here:  http://www.rsmadness.com/galleries/past_covers.html. Also available on their website is their publication "Album is Scenic Art," which includes some of the best work by the artists who submit to the magazine. 
 
Just for fun, I stamped one more image on my scene.  With the right sentiment, this would make a fun birthday card. 
 
Happy stamping!
 
 
Stamp credits:  lady with cake and lady with shopping bag, Ronnie Walter for Inky Antics; window, Another Stamp Company.


Monday, September 10, 2012

A Tutorial on Rubber Stamp Masking

I was talking to a rubber stamp business owner at a convention this spring, and he commented that convention-goers were desperate to take lessons from the vendors to they could learn about new products and different techniques.  One class I was lucky enough to take years ago was "Scenic Stamping," which covered how to create realistic (or whimical) scenes using a number of rubber stamps.  The technique that gives a scene depth is called 'masking.'  Masking is covering up something you already stamped.  Then, you can stamp over it, and when you remove the mask, the first image appears in the foreground and the second image you stamped appears in the background. 

Here's a quick tutorial on the basics of masking. 

First, decide what kind of scene you plan to stamp.  I wanted to make an ATC (artist trading card) of a haunted house.  I selected several stamps in my stash that I thought would work. Then, I stamped out a general composition for the scene.  Notice that the stamped images overlap one another.


Rough composition.
After determining that I wanted to the ghost to appear crisp and clean, I knew it would need to be stamped first and masked.  To make a mask, I use post-it notes.  They come in many sizes (to accomodate all shapes of stamps) and the sticky part holds the mask in place.  Simply stamp the image on a post-it note right on top of the sticky part, and trim carefully right on or just inside the outline of the image.  (One stamping company makes a roll of sticky paper to use for masking, but I don't know the brand.)

I stamped the ghost onto cardstock, then covered it with its mask.  The second image I stamped was the house.  Masked it, too, because I wanted to add clouds to the sky, and a pumkin in the window.


To add the pumpkin, I cut out the window from the mask, put it back in place over the house, and then used a stamp positioner to stamp the pumpkin.

A stamp positioner is the best way to place a stamp just where you want it (whether it's a pumpkin in a window or a greeting on a card).  The 'L' shaped positioner comes with a piece of clear plastic.  Slide the plastic into the 90 degree angle of the positioner, and stamp your image onto the plastic, being careful to place the wood or acrylic block right next to the positioner.  Remove the stamp.  Pick up the plastic sheet and place it on your work, arranging the stamped image just where you want it.  The clear plastic allows you to see where the image should be stamped.  Hold the plastic down, and slide the positioner back in place.  Remove the plastic sheet, holding the positioner still, and stamp your image, again being careful to place the block right next to the positioner. That's all it takes. 


I added color to the sky and the foreground.  You can do this any way you like, but I prefer Judi-Kins color duster brushes with ink from pads. 

Once the background and foreground were finished, I removed the masks and added a few more details -- the cat, bats and cobweb.  The scene is complete and ready to color. 


The trickiest thing to learn about creating a scene (in my opinion) is figuring out what you need to stamp and mask first.  I'll show you more about that in my next post! 

Now go stamp something quick!

   
Here's the finished ATC. 
 
 
Stamp credits:  ghost - unknown; house - Viva Las Vegas Stamps; cat, bat and pumpkin - Hero Arts?; cloudy sky - Stampscapes; grass - unknown 

Saturday, September 8, 2012

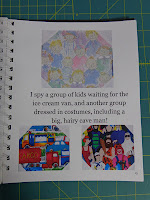
The "I Spy" quilt I started in the spring is finally ready to be dropped off to the woman who does long-arm quilting for me!  This is the fourth "I Spy" quilt that I've made, and it's a special one because it is for my grand-nephew Alex. 


So what's so unusual about an I Spy quilt?  The series of "I Spy Book of Picture Riddles" were the rage when my children were little.  The books use photographs over a two-page spread with loads of interesting objects mixed together, and the riddle at the bottom of the page encourages the reader to find the objects mentioned in the the photo.  This "I Spy" quilt is for a twin bed and is made of 98 different print fabrics.  As with the "I Spy" books, a child can be facinated for hours looking at different items in the quilt blocks.  To make this gift  even more unique, I took photos of several of the blocks, and then wrote riddles to go with the pictures, and created a book just for Alex.  Each page is printed on cardstock using a color printer, and then I bound the book with a Zutter spiral binding machine. 

When my neice Jennifer reads the book to Alex at bedtime, he can find the objects mentioned in each riddle. 

The first "I Spy" quilt I made is tucked away until the winter, when it goes on my queen-sized bed (there are 154 different blocks in that one!) to keep my DH and me warm.  The other two were baby quilts, one for my godson Patrick, and one is still waiting for another grand neice or nephew to be born. 

I've kept the scraps of print fabrics in my stash...maybe I'll make another someday, but after hours working on this one, it will proably be a while. 

Happy sewing!

Renee


Thursday, September 6, 2012

My first published artwork!

It's so exciting when you see something you have created in print! 

I subscribe to RubberStampMadness magazine (www.rsmadness.com), the premier magazine for rubber stamp artists.  At the back of each issue is a call for submissions.  When I saw the call for artwork based on the theme "She loves...", I knew exactly which stamp I wanted to use.

For years (before I was married), I had a bumper sticker on the back of my VW that said "The more I know men, the more I like my dog."  Looking back, I think it signified my free-wheeling spirit through college and my first few years of 'adulthood.'  When I saw my bumper sticker stamp on the Viva  Las Vegas Stamps website, I had to buy it.  It sat in my stash unused until I saw the call for art based on the "She loves..." theme.

So, how would I create a visually appealing card that would reflect the saying?  After nearly 25 years of marriage, there have been plenty of smile-worthy (or eye-roll worthy) gifts that I've received from my dear husband (DH, on further reference).  Early in our marriage, I got a lot of jewelry, but as the years have gone by, I've received more 'practical' gifts -- a new electric skillet, a complete set of nesting plastic storage containers, and a barrel that turns leaves and table scraps into compost. Good thing I'm low maintenance. 

(I'm going to insert a disclaimer here:  my DH is a wonderful man who never, ever complained about my long distance telephone bills (remember them??) or flinches when I spend hundreds (or more recently thousands) of dollars for a new sewing machine.  He may roll his eyes from time to time when a package of rubber stamps arrives in the mail, but he actually went shopping at a stamp store by himself, and brought me home some very funny stamps!)

Working with the theme of a husband giving a 'practical' gift as a birthday present, I searched through my stamps and found what I needed, except for one -- the gift.  I did an on-line search and found the vacuum cleaner stamp, and knew I was in business.   

I sent my card in to the magazine, and was thrilled to receive a call from Roberta Sperling, the editor, saying that it would appear in Spring 2011 - Issue 171.  She said my card evoked a lot of laughs from the staff and visitors who saw it, and that's exactly what I was going for when I created it. 

What do you think?

Stamp Credits:  Vacuum, collie, saying - Viva Las Vegas Stamps; diamond floor - Judikins; Lady - Inky Antics; bow, balloons - Judy Pelikan; Happy Birthday text - Leisure Arts

Tuesday, September 4, 2012

Welcome!

Hi!  Welcome to my blog!  After a few years of thinking about doing this, I finally was motivated by my friends at Viva Las Vegas Rubber Stamps.   I've been using their stamps for a while (I especially love their pithy, funny sayings for cards) and they are looking for 'design team' members.  What's a design team?  Well, it is a group of people who use the products from the store to create cards that are displayed in the store and on its website.  Sometimes the artwork may be used in an advertisement for the stamp company.  One thing I've learned over the years is that the more you stamp, the better you get at it, and being on a design team would keep me stamping. It's not a done deal -- I have to submit artwork, and posting things to my blog will help with the process.

I've visited their store in Las Vegas, and it is a stamper's dream.  Literally floor to ceiling rubber stamps, fairly well organized by category, with surprises around every corner.  Whenever I'm looking for a particular image, I check out their extensive on-line catalog first.  For one card, I needed a vacuum cleaner, and sure enough, Viva Las Vegas Stamps had it.   That card was eventually published in Rubber Stamp Madness Magazine. (I'll post a photo soon!) 

I don't spend all of my time stamping...a good deal of fabric occupies my studio space, as well as three drawers of beads.  So my goal for this blog is to share with you all of the fun stuff that I'm working on:  stamping, sewing, beading, crafting.  Hopefully I will inspire you to do something creative.  For those who say 'I don't have the time,' I would reply that we find the time to do the things we love.  Think back to what you loved to do when you had all the time in the world, and reclaim some 'me' time to pursue what gives you joy!