Thursday, November 21, 2013

It's Beginning to Look a Little Like Christmas

I'm back in my home state of Missouri this week for a visit with my dad and my sister's family.  My dear brother-in-law is a bit obsessive about decorating for the holidays, and took full advantage of the warm weather last weekend to hang his outdoor lights.  He also managed to set up the 'small' (that would be 8 feet tall) Christmas tree).  So, when I arrived last Saturday, I was greeted by this:


This is their 'Travel' Christmas tree.  It's covered with ornaments that my sister and her husband have purchased on trips they've taken over the years, plus a few that friends have brought them from far flung places.  My brother-in-law enjoys unwrapping each ornament and reminiscing about the trip when it was bought.  

Some of the ornaments are really fun, but I did notice a lot of moose on the tree!
It's actually a pretty neat idea, if you travel a lot.  My family tree has a few ornaments that we've picked up when we're away from home, but not this many!

So, even with this beautifully decorated tree up, my brother-in-law kept talking about the 'Cowboy' Christmas tree, until finally I said, "Oh, come on!  Let's put up that tree too."  It didn't take a lot of arm twisting for him to run to the basement to fetch the other decorations.  (We first had to move the Travel tree into their living room, 'because the cowboy decorations need more space.')

I helped unwrap the ornaments, but the decorating part was all his.  

In addition to the tree, several Cowboy Santas decorate the fireplace mantel
My sister and I contributed our sewing skills to the Cowboy Snowman Christmas tree skirt.  I think there are more cowboy ornaments than there are travel decorations!
  
The tree includes chili pepper lights, rope and faux barb wire 'garland.'
I could be guessing here, but I think the Cowboy Christmas tree is an off-shoot of the Travel tree.  My niece and nephews took many trips to the American West with their dad (thus the moose on the other tree), and probably started picking up ornaments like these, which evolved into a set of decorations in their own right. So where ever they see them, they buy Cowboy Christmas items.  Too bad they only put it up every-other year, except this one!  
The barb wire garland is pretty realistic.
I've already been warned that I will be pressed into service when the 'big' (that would be 12 feet tall) tree goes up on Saturday.  I'm anxious to get home and get my house decorated!


Sunday, November 10, 2013

On a Creative Roll

Do you ever feel like you're in the 'zone' when you are working on a project?  You know, you get so tied up in what you're doing that time flies by, but the project is going so well, you just don't want to stop?

I had one of those days last week, and I love the feeling!  Want a peek at what I was working on?

Leather and Stone Necklace
I'm so excited about this design that I immediately started another sample.  It was inspired by a piece in an old issue of BeadStyle magazine by Marcy Kentz.  I will be teaching the techniques on how to create this necklace at The Bead Garden in Havertown, Pa., on December 19th. (To go www.thebeadgarden.com to sign up.)

Just a few details, then, on this piece.

If you've been reading my blog, you know I like to 'recycle' stuff.  In this case, it's the leather that is re-purposed.  Someone gave me a black suede vest that was too small for me, and rather than donate it, I cut it apart and saved the suede pieces.  I have other similar pieces of leather, from garments or leather items (including a soft-sided briefcase).  I trimmed the leather using my rotary cutter, making strips that were 1" wide.
Trimming butter-soft brown leather that was once a jacket sleeve.
I rounded one end of each strip with scissors, then used my Japanese screw punch to put three tiny holes in in each strip, about 1" from the rounded end.

A Japanese Screw Punch is a great tool for leather work, book making and other hobbies.
The screw bits come in various sizes; this one is 1.2 mm.  
 Softflex beading wire is my stringing material of choice for natural stone or glass beads.  I cut three pieces of wire, and inserted them through the holes.  A small seed bead and a micro crimp bead secured them to the 'wrong' side of the leather.
A clamp on one end keeps the beads from falling off.

After stringing on the stones, I attached the other end of the wire to the second strap in the same manner.  A little E6000 glue on the end was a little added insurance that everything would stay together.  

After determining the finished length of the necklace, I trimmed the excess leather and added a 1" ribbon clamp and a clasp.  

My mind is racing with other stone, metal and color combinations that I can put together to make more of these statement necklaces!  


Tuesday, November 5, 2013

Recycled I-Pod holder

My d.h. was working in the basement (it's a long story...) and was struggling to keep his i-pod from falling out of his pocket.  During lunch break, he asked if I could 'rig up' a band to go around his arm to hold the i-pod.  I think my son has one of those work-out bands for the i-pod, but I have no idea where he got it.  We talked about the design a little bit, and I took some measurements and got to work.

I have to explain something...I recycle fabric and findings from manufactured items, especially if they are unusual or difficult for the home sewer to purchase.  I knew I would need stretchy fabric, and started digging through my fabric stash to find something appropriate. Low and behold, I came across this:

I know you can buy neoprene somewhere, but it sure isn't anywhere near me!
It is a neoprene laptop computer sleeve.  It had a zipper that went around three sides, which I took the time to remove (you never know when you'll need a 20 inch zipper with double pulls).  Once all the stitching was removed, there was plenty of fabric to work with.

The deconstructed laptop bag.
I cut out a pocket the size of the i-pod, then I pieced together two longer strips equal to the circumference of his arm, plus three inches for a tab to make it adjustable.  Using a narrow zig-zag stitch, I stitched the pocket in place, then trimmed the ends of the strip so it would fit through a sliding buckle.

The pocket stretches a bit so the i-pod fits snugly.
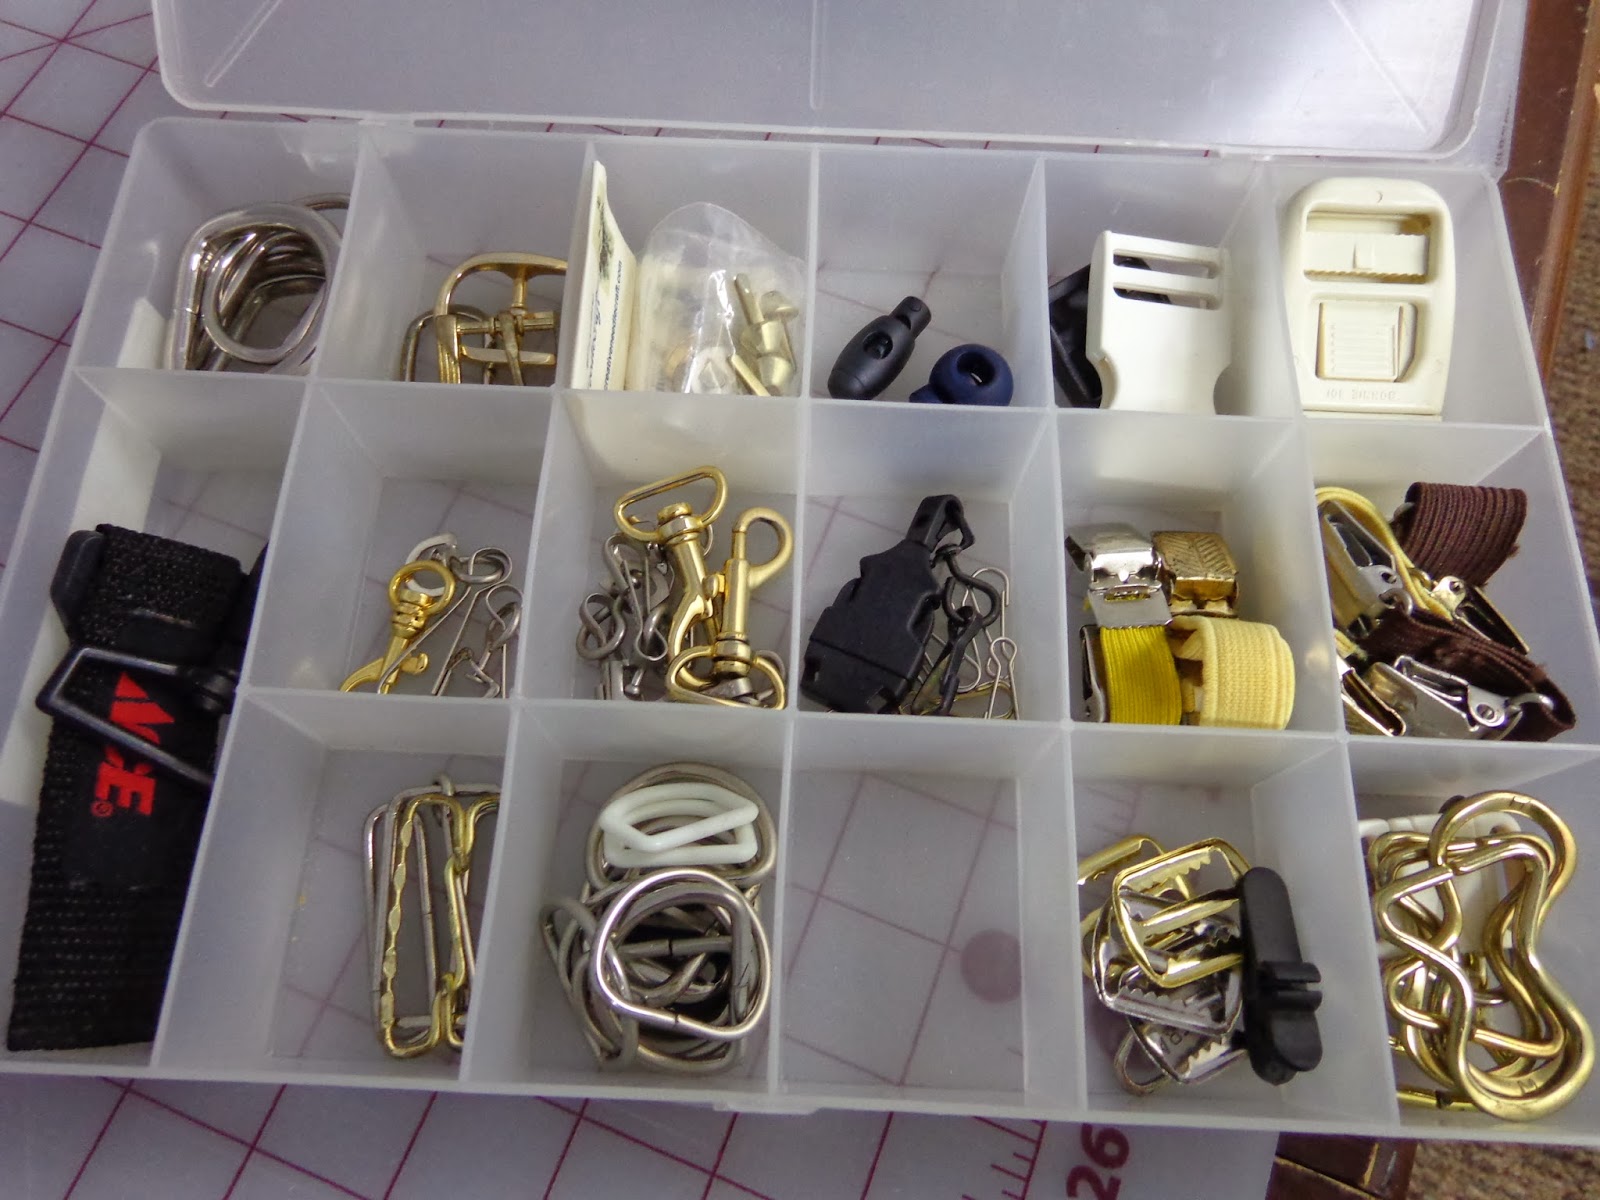
Again, I found just what I needed in my stash.  Whenever my husband or kids throw away something like a backpack, I cut off the hardware and toss it into a bin.  There have been many occasions when I dig through that bin to find just the right hook, buckle or D-ring.

My tray of various buckles, clips, D-rings and other bits and pieces of hardware.
Next, I added a bit of velcro that I removed from something else once upon a time.  This piece has both the hook and loop part on the same side. The tab with the 'hook' part slips through the buckle, then folds back onto the 'loop' part to hold the armband in place.


Here's the final product.  Looks great, works great, d.h. is happy!  Now that he has tunes at his disposal, maybe the basement will be finished by Thanksgiving!!

Saturday, November 2, 2013

A Vintage Singer Sewing Machine Gets a New Life


Several years ago, I saw one of these lamps and admired it quite a lot.  I always hoped that someday I'd be able to own one.  When I stumbled across a vintage Singer sewing machine at a flea market a few weeks ago, I jumped at the chance to make my own lamp.  The man wanted just $20!

One of the great things about vintage Singer sewing machines is that you can use the serial number to search for the year the machine was manufactured. (www.singerco.com/support/machine-serial-numbers)


This serial number indicated that this model was made in 1925.  Imagine...a machine that's nearly 90 years old!  What is really surprising is how great the gold graphics still look!

The challenge was how to attach a light fixture to the back of the machine.  Luckily, this model already had a small work light on the back.

I was able to unscrew the work light from the machine and disassemble it.   Once I took it apart, I realized I could use the bracket to attach the new lamp to the machine, and the black base was threaded and would hold the new pipe.

The hardware store had a lamp re-wiring kit and a white silk shade.  I had to buy a threaded pipe and a nut separately.  The entire bill was about $40.  After cutting the electrical cord of the old lamp, I ran the new wiring along the same path..  I changed the position of the lamp bracket from horizontal to vertical, and followed the instructions on the back of the lamp kit to thread the pipe, attach the socket base, wire the socket and add the harp, shade and light bulb.  

The new threaded pipe fit snugly into the existing hardware, but I did
turn the bracket 90 degrees to hold the lamp upright.
Next, the sewing machine got a bit of TLC.  I dug out the brass polish, Orange Glow wood cleaner/protector and good ole' fashioned Johnson's paste wax to shine up the metal case of the machine. I also added felt pads on the bottom of each corner of the wooden case, to prevent scratching the furniture.

Time for a little clean up!
Although I'm not generally very mechanically inclined, the step-by-step instructions on the lamp re-wiring kit were easy to follow and I'm proud of myself for finishing this without any help from my d.h. (truth in reporting here -- I did have my son tighten the nut and screw on the bracket holding the pipe...I just couldn't get it quite tight enough!).  The moral of the story -- don't be afraid to re-purpose something neat into a lamp!

My vintage Singer sewing machine lamp!
[After taking another look at the photos of the lamp, I realized the shade didn't cover the base of the socket.  For $4, I bought another harp, two inches smaller than the one pictured, and swapped it out...that solved the problem!]


Tuesday, October 15, 2013

A Walk in the Fall Leaves, Made Possible with Rubber Stamps

It's a beautiful time of the year for a walk in the woods, and the changing leaves make the perfect backdrop for a glorious fall wedding!


My nephew and his bride were married in upstate New York in late September, and their reception was held in a picnic pavilion near a lake.  This card was inspired by that unique venue.  It's been a while since I did any rubber stamping, but a stamp set I picked up a year ago was perfect for the theme.

Designed by Kittie Caraccido, "Kittie Kits - Cause a Scene" are manufactured and sold by Rubbernecker Stamps (www.rubbernecker.com).   This kit was Scene 9, and contains 43 stamps.

Some of them are what I call a "micro-stamp," a single image that is very tiny, like one falling leaf or an ear of corn.  The kits are designed for scenic stamping -- creating a 'picture' using the various bits and pieces.

Obviously, for a wedding card, I needed a bride and groom, and found the happy couple in my binder of cling mounted rubber stamps.  The stamp is by Another Stamp Company, and came in two sizes (www.anotherstampcompany.com).  I used the small size for this card.  (By the way, most of the stamps I buy now are cling mounted...they store in binders and take up less space in my studio.  I have acrylic blocks in a variety of shapes to use with them.)  I also found a couple more stamps to incorporate into the scene in my stash.

To begin, I stamped out the scene on scrap paper to determine what would be in the foreground and what elements would be in the background.  Then each image was stamped onto a post-it note or masking paper (a thin, white paper that is covered with the same low-tack adhesive as post-it notes) and trimmed out carefully.  These 'masks' will allow me to stamp over an image, without having the lines of the second stamp show up on the first image.  The image in the foreground is stamped first, then masked, and the images in the background are stamped next. (For more on masking go to http://simplydevinecrafts.blogspot.com/2012/09/a-tutorial-on-rubber-stamp-masking-i.html )  Using black ink, I stamped the bridal couple and the farm stand first, layered the masks over those two images, then overstamped the walking path, trees and pumpkins.  The grass, leaf piles and sand were added next, and to finish the scene, I stamped a cluster of leaves over the trees several times, using an 'Autumn Leaves' Kaleidacolor ink pad.
The scene was stamped on a half-sheet of 8.5" x 11" cardstock.
Now comes the fun part -- coloring!  I worked a rubber stamp show for a company last year, and asked them to 'pay' me with Copic markers.  I have 56 colors, and I'm still playing with them, trying to improve my technique.  I decided to use them (instead of Prismacolor pencils, my other favorite coloring tool), and started with the leaves on the trees.

Ultimately I used six different colors for the leaves.  The farm stand and pumpkins were colored next. The grass created a challenge, because most of my green markers are pretty vibrant, but I discovered that lime and light olive, together with grass green, looked pretty good.
Copic markers blend well with each other. You can go over the same place with a different color
to achieve a realistic look.  
Without a sand colored marker, I opted to use the Prismacolor pencils to color the walking path.  Here's a technique I learned just last year -- Gamsol, an odorless mineral spirit, is great for blending pencil coloring.


'Before' using Gamsol


In the first picture, you can see the 'scribble' lines of the three pencils I used.


Using a rolled paper stub, I applied Gamsol to the coloring, rubbing it in a circular motion.

It blends the colors and brightens them somewhat.  I was happy with the way the path looked when I was finished.


'After' using Gamsol.
 

The final thing to color was the sky.  For some reason, coloring skies always trips me up.  It's hard to come up with the right shade of blue, and I debate whether to put in some clouds for good measure.  Coloring a sunset a bit easier, but that's not the look I was going for here.

Thankfully, Copic has a color called 'Cool Shadow.'  It falls on the blue-green spectrum, but it was just perfect for the sky on this fall scene.  

To finish the card, the panel was trimmed to 4.25 x 6.25 inches, mounted on a patterned paper, and then affixed onto a 5 x 7 inch card.  I added the sentiment "...and they lived happily ever after...' to the inside of the card (stamp by Another Stamp Company).

Doesn't it look like a nice day for a walk in the falling leaves?

Sunday, September 22, 2013

Time for a little "Boo!"

The weather here has turned cooler, and today is the first day of Fall.  Halloween is little more than a month away, and I found the perfect beads for a scary little project!


The Pennsylvania Quilt Festival was at the convention center in Oaks, Pa., this weekend, and in the same complex, the International Gem and Jewelry Show had set up.  Woo-hoo!  Two things I love under one roof!!

On a short run through the gem and jewelry show, I spied these cute beads.  They are made of dyed howlite.  I've seen skulls before, but not pumpkins or sliced skeleton faces.  And they were cheap!  Only $2.00 for a strand of 16 beads!  I quickly snatched a strand of each.


Turning the beads into earrings was easy.  The skeleton faces were threaded onto headpins.  I made a wire-wrapped loop at the top of each and slipped them onto french hook earring wires.  For the pumpkins, I added a small, fire-polished Czech glass bead to make a 'stem'.

Including the findings, each pair cost me under $1.50 to make!

I've already given one pair as a gift...and have a few more set aside for family and friends.  Just looking at them makes me smile.  I can't wait to wear them in October!


Saturday, September 14, 2013

Knotted Pearls with a Twist

A customer came into the little shop where I work (The Bead Garden, Havertown, Pa.) in search of supplies for Christmas gifts.  Yes, if you like to give hand-crafted Christmas gifts, now is the time to begin working on them!  Her plan was simple:  buy enough large, glass pearls in varying colors to make 30 necklaces of the same design.  She had purchased a necklace while on a trip to Italy, and wanted to 'copy' it for her friends. To find the supplies she needed, I examined the necklace, and knew I'd have to try one myself.


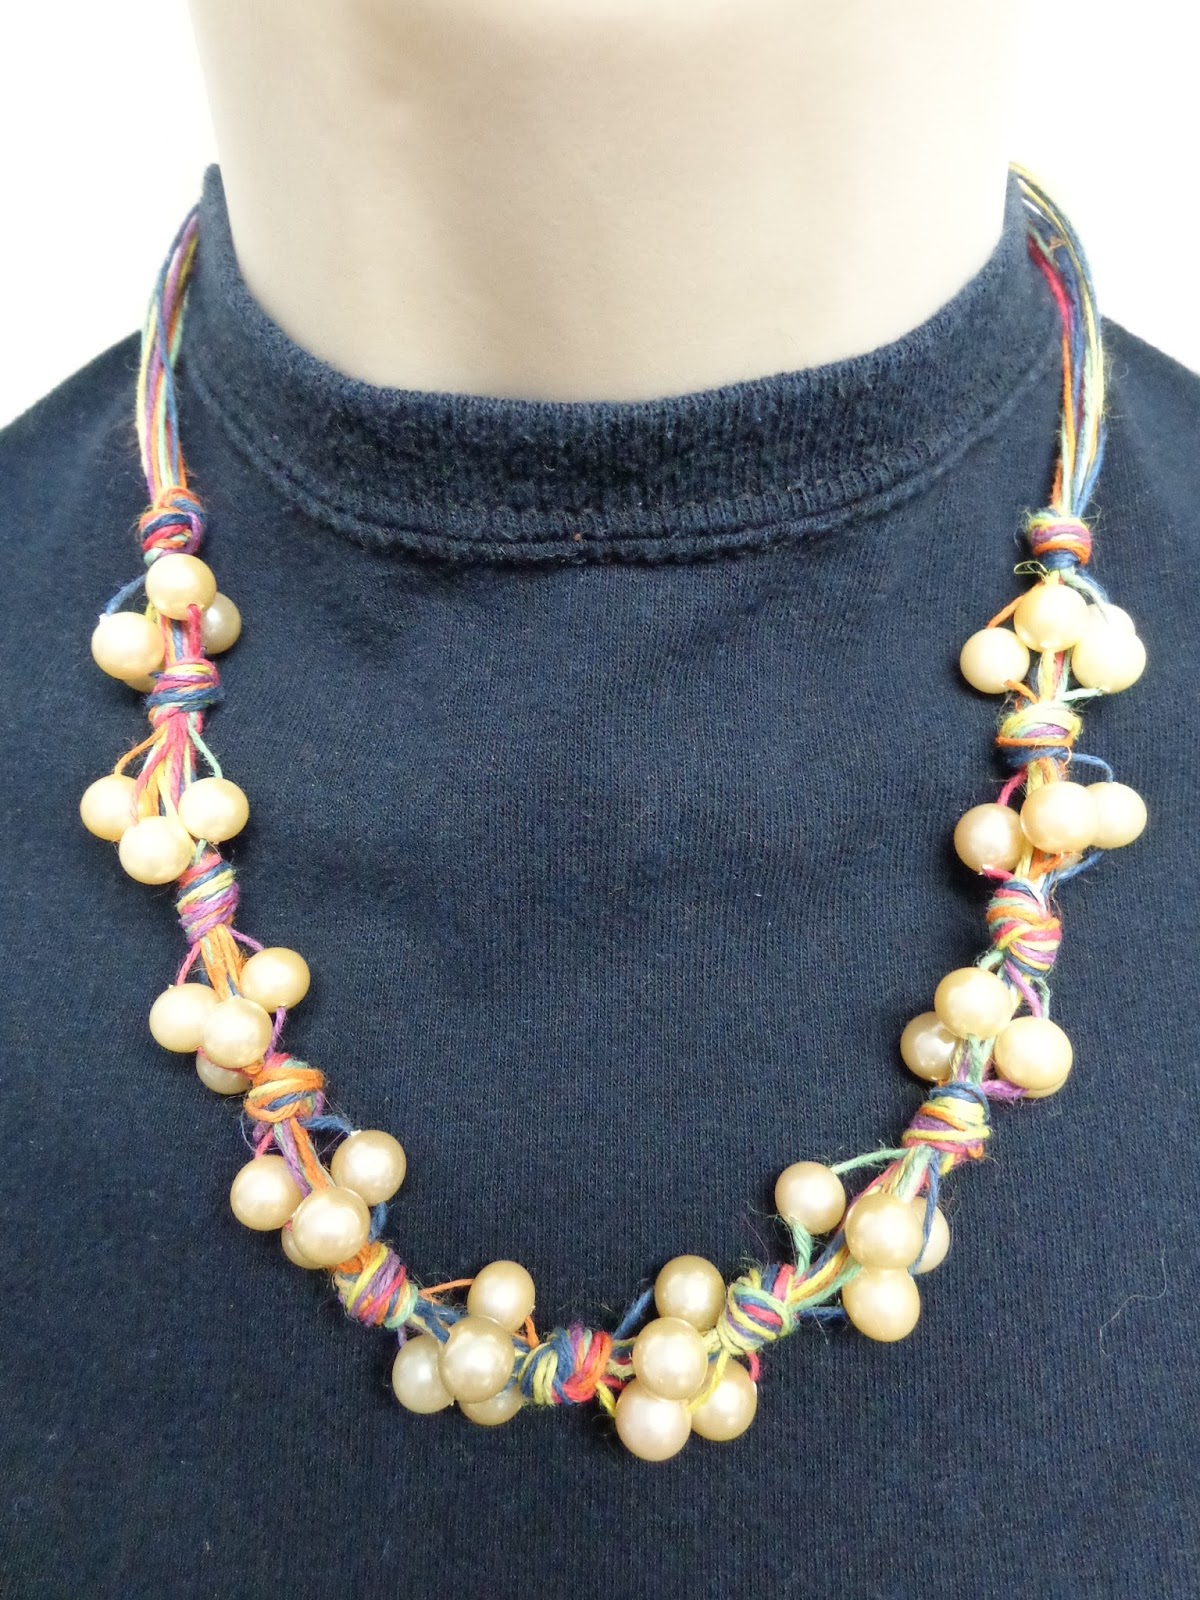
The concept is pretty simple -- using 6 seven-foot lengths of very fine hemp cord, you make overhand knots between clusters of four beads.  The necklace can look casual or dressy, depending on your choice of beads.

Here's a quick lesson:


I selected a fine hemp (also called 'jute') made by Darice.  It comes in a variety of colors, but for this necklace, I used a varigated rainbow pack.  I cut 6 pieces of hemp, each seven feet long.  I tested the beads to be sure I could the string them onto the hemp.  To make that easier to do, I first hardened the last two inches of each strand of cord with brush-on super glue.


Do this over a piece of paper, so glue doesn't get everywhere, and give it at least 20 minutes to dry thoroughly.  Some cords were a bit thicker than others, so I trimmed the end of the cords at an angle so they would slide through the beads.    

Fold the cords in half and create a loop for the 'clasp' end by making a knot the correct size for the closure.  I intended to use a larger pearl for my 'clasp,' but a button would work, too.
 

The next knot was made about 5 inches down the cords.  This space allows the necklace to lie flat against the back of the neck.  (This is also a good idea if you have a limited number of beads -- why use them where no one will see them??)

Now, separate out four of the strands, thread one bead on each strand, and push all four up to the knot just created.  I left a little bit of space between knots, so the beads can move a bit.
 

Just below the cluster of beads, create another over-hand knot.  Push it up to the base of the cluster and tighten it.  I had to tug some cords individually to keep the knot from getting 'loopy.'

Select four cords from the bundle and string on four more beads, pushing them to the base of the previous knot.  Create another overhand knot and tighten it.  Repeat the same process until there are several clusters of beads.  (I made 10 clusters on my necklace, which had a 18" finished length.)  Note:  after each knot, pick out four cords from the bunch to string the beads onto -- the process of knotting the cords makes it impossible to thread beads onto the same string every time.  Don't pick cords next to each other...spread them out a bit.

To end the necklace, make a knot under the last cluster of beads, and then make another knot about 5 inches from the previous one (remember, that part goes around the back of the neck).

Separate one or two cords out and run them through the closure bead/button.  Gather all of the threads and tie one more overhand knot snug against the closure bead.  Snip all of the cords about 1/4 inch beyond the closure and brush them with super glue to keep the knot secure and the thread from fraying.
 

My necklace was made using 10 mm glass ivory glass pearls, which I had on hand.  Can you imagine this made up using much larger 16 mm maroon or teal glass pearls with natural hemp?  It would be a statement piece!  My customer spent about $200 for supplies that will create 30 necklaces -- gifts that will look much pricier than $7.00 each to create!