Showing posts with label beading. Show all posts

Saturday, February 14, 2015

Yea! I Mastered the "Pinecone Delight"!!

What's that, you say?  Well, the "Pinecone Delight" is a beading pattern created by Barbara Grainger.
Beaded Pine Cones
I saw this really cool photo (above) on Pinterest, but, as happens to me a lot, when I clicked on the page for the photo, there were no directions there.  (The page was in Russian!)

I went back to Pinterest and narrowed my search, using the name of the beads used in the project (long magatama).  After scrolling down a bit, found Barbara's name and a link to a website where I could purchase the directions (http://stitchboard.com/mall/showItem.php?in=10222)
It costs $10, which you pay via paypal, and then the website sends you a link to download a PDF file of instructions.

After teaching beading and writing instructions for nearly 10 years, I can tell you that Barbara knows what she's doing.  Her step-by-step instructions were thorough, had excellent graphics and had been tested for clarity.

And, for this project, she knew to say the skill level was for intermediate to advanced beaders.  Take my word for it...she's right!  This is not a project for beginners!

Long magatama beads are elongated, and have a hole toward the top.  They have a right and wrong side, and this pattern requires that you know the difference.
The bead on the left is right side up, the bead on the right is wrong side up.

Some beads are picked up on the needle 'right side up' and others are picked up 'wrong side up.'
What makes the piece look like a pinecone is the shape of the beads, all pointing in the same direction.  The beading went quicker when I sorted the beads into two piles, one pile right side up, the other pile wrong side up.

Rights side up beads on the left, wrong side up beads on the right, made it easier to follow the directions.  
I generally use Fireline brand braided bead thread by Beadsmith for seed bead projects, and started my pinecone with that.  After four or five rows, I had a mess that I couldn't fix, and decided to start over.  Magatama beads have very large holes, and I thought that thicker thread would fill the holes and hold the beads in place better.  Size 4 no-stretch nylon bead stringing thread by Beadsmith was thicker, so I switched to that.  The change was a good one, and the project went much easier.    

The starting row of this project is ladderstitch.  Subsequent rows are worked in brickstitch.  One thing I discovered is that the tension on this project is loose...if you pull the thread too tightly, the beads will flip, over.   Most projects I've done require a tighter tension. As I added each bead, I held it in place right side up with my left thumb as I stitched through it.  It's a little awkward, but, as I said, the beads tend to want to flip over until you get them locked into place.

As the pinecone grew longer, it was getting 'squishy,'  I fixed that by dropping a 10mm bead in the center of the cone.  Just having that filler bead in place made adding the rows easier.
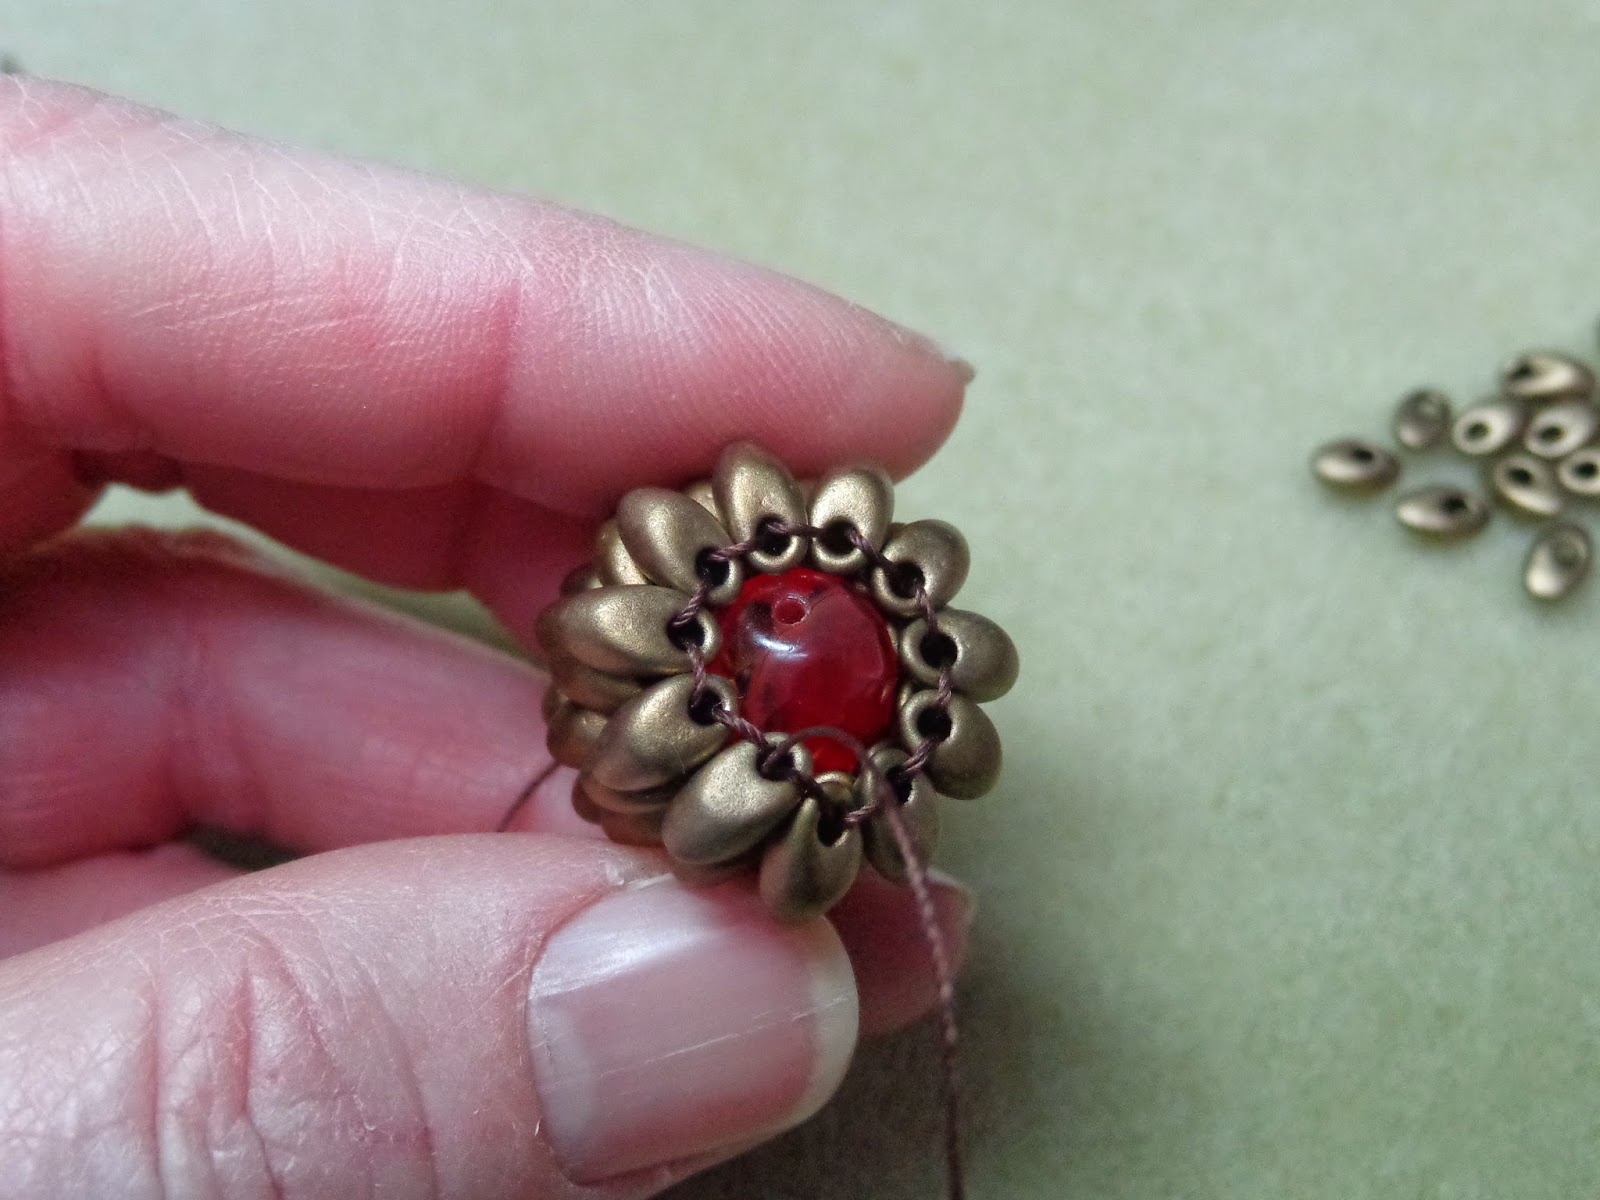
I ended up leaving the bead inside the pinecone, just to give it some 'stuffing' to hold its shape.  You can't see it on the finished project, so I will continue to add a bead when making more pinecones.  

One other note about Barbara's directions...she says "you work from the top of the pinecone downward, but you hold the pinecone upside down as you work it."

This is opposite of how I would describe a pinecone.  I think the TOP of a pinecone is the part attached to the twig on the tree, and the BOTTOM is the pointy part at the other end. If you think of it the same way as I do, you will be working from the bottom of the pinecone toward the top, in which case it isn't being held 'upside down,' as the instructions say.  I mention this so you don't wonder why the pinecone 'leaves' are laying the wrong way.  If you follow the directions, it will turn out fine...the top/bottom description is a bit confusing.  

Oh, the bead cap with the wire wrapped loop at the top was added by me so the pinecone could hang, either as an ornament or as a pendant. (See, I called it the 'top.'  Barbara would call it the bottom!)


The project took about three hours.  I can't wait to get some other colors of long magatamas and try this again!


Thursday, February 20, 2014

Peyote Project

Peyote stitch is an old, off-loom bead weaving technique that takes a little time to get, but generates amazing results.  Beaders much more experienced in peyote stitch than I use it for complex jewelry and covering sculpture to create one of a kind pieces of art.

I saw a simple project in the June/July '13 Beadwork magazine designed by Pamela Kearns that I decided to try.  It incorporates a small piece of odd-count flat peyote stitch work, plus licorice leather, a relatively new product to the beading and jewelry market.

After a few fits and starts, here's the finished piece:


While the instructions in the magazine call for two smaller peyote pieces, I decided I wanted to go wider. I found a great website that helped me design my own zigzag pattern. While I wouldn't consider myself an expert in peyote stitch, here's how I made my bracelet.

I used two colors of size 11 seed beads, a size 10 beading needle and about 2 yards of Crystal Fireline, size D, a nylon braided beading thread that is ideal for bead stitching.
 
After a trial run, I determined that I needed 32 rows of stitching to fit snugly around the licorice leather.

I put a stopper bead on my Fireline (threading it on, moving it to within 6 inches of the end of the cord, and putting the needle back through the bead to create a 'slip' knot.)

To make a bead stopper, pass the needle through the bead in the same direction twice, then pull up the slack.  Leave about 6 inches of thread to weave into your work when you are finished.

To being peyote stitch, you thread on the first two rows of beads.

In this case, string on: 2 red, 5 yellow, 3 red, 5 yellow 2 red.  You have one string of 17 beads, with the needle on the right.

These 17 beads will make up rows 1 and 2 of odd count peyote stitch.
For Row 3, now working from right to left:  string on 1 red, skip the last bead in the previous row (in the diagram it's the last red bead numbered 1 on the right), and pass the needle through the next bead (in this case, the first red bead on the right in Row 2). Pick up 1 red, skip the next bead, and pass through the next bead (in this case, the first yellow bead from the right in Row 2). Continue on, picking up and skipping a bead, and passing through the next bead, following this pattern:
1 yellow, 3 red, 1 yellow, 2 red to complete Row 3.

Work row three from right to left.
At the end of Row 3, pull the beads snug, and tie a square knot with your working thread and the tail; pass the needle back through the last bead, now heading from left to right.  Your work may look a little wonky at this point, but don't worry...as you add Rows 4 and 5, it will begin to straighten out.  
Half-way through adding row three, you can see that every other bead starts to 'pop up'.  
Row 4 is 9 red.  Every other bead in Row 3 should be sitting a little higher than the bead in Row 2.  As you add each bead in Row 4, pass the needle through the bead that is popped up from Row 3, so they nestle together.

Add row 4 beads from left to right.
For Row 5, working right to left: pick up 1 yellow, pass through the last red on Row 4, then add 3 red, 1 yellow, 3 red, and 1 yellow to finish the row, passing the needle through every bead in Row 4.

At the end of Row 5, you can do a 'figure eight turnaround' by passing the needle back through the red 4, red 3 and yellow 2 on the diagonal, then pass through the red 2, up to the red 3 on the diagonal, and from the outside, pass the needle back through the last 5, so you're in position to continue with Row 6.

To turn around at the end of each odd row, pass the needle diagonally through three beads below the last bead, then work the needle back to the outside edge of the last bead in the row.  Pass through the last bead so your needle is in position to do the next even row.  The thread path will make a figure 8.  
Do this figure 8 turnaround at the end of the odd rows.  The pattern for the rest of the zigzag is as follows:

Row 6:  1 yellow, 2 red, 2 yellow, 2 red, 1 yellow
Row 7:  2 yellow, 1 red, 3 yellow, 1 red, 2 yellow
Row 8:  9 yellow
Row 9:  1 red, 3 yellow, 1 red, 3 yellow, 1 red
Row 10:  1 red, 2 yellow, 2 red, 2 yellow, 1 red
Row 11:  2 red, 1 yellow, 3 red, 1 yellow, 2 red
Row 12:  9 red

The pattern for Row 13 is the same as Row 5, and so on.  Repeat the patterns for Row 5 through Row 12 to continue the design, until you get the length you desire.

To fit around my piece of licorice leather, I needed 32 rows...my last row was 9 yellow.  At that point, I folded my work in half, and 'zippered' the two ends together by stitching them back and forth to create a tube.  Once the tube of peyote stitching was closed, I buried my thread tails by working the needle through several beads.  I used a Thread Zap II by singe the end of the threads, instead of tying a bulky knot.

You may want to check the length of your work against your leather as you go...remember that you want the peyote tube to fit snugly on the leather.  You may need to add or subtract rows to fit your leather.

I finished my bracelet by adding two Regaliz Slice Spacer beads and a Regaliz magnetic clasp designed for the licorice leather.  I used a bit of super glue to hold the spacer beads into place and the attach the clasp to the leather.

If you can't find licorice leather, or just really like the zigzag pattern, you can make your piece of flat peyote long enough for a bracelet.  You probably will need to add more thread...just start weaving a new piece through the middle of your work until you get the needle into the position to continue stitching.  I rarely tie knots in bead work, I just weave in a new piece of thread and continue on.  The best clasp for this type of bracelet is the sliding bar clasp.

Gold Plated Slide Bar Clasp - 4 Strand

A really great source for Regaliz findings and licorice leather is Goody Beads (www.goodybeads.com). Their prices were among the best I could find.  They also carry the Thread Zap II.  

I'm so happy with the end result, it was worth all of the missteps to get there.  I'm not sure I'll make another...the materials ran about $25, but I think it's worth at least double that!  


Sunday, November 10, 2013

On a Creative Roll

Do you ever feel like you're in the 'zone' when you are working on a project?  You know, you get so tied up in what you're doing that time flies by, but the project is going so well, you just don't want to stop?

I had one of those days last week, and I love the feeling!  Want a peek at what I was working on?

Leather and Stone Necklace
I'm so excited about this design that I immediately started another sample.  It was inspired by a piece in an old issue of BeadStyle magazine by Marcy Kentz.  I will be teaching the techniques on how to create this necklace at The Bead Garden in Havertown, Pa., on December 19th. (To go www.thebeadgarden.com to sign up.)

Just a few details, then, on this piece.

If you've been reading my blog, you know I like to 'recycle' stuff.  In this case, it's the leather that is re-purposed.  Someone gave me a black suede vest that was too small for me, and rather than donate it, I cut it apart and saved the suede pieces.  I have other similar pieces of leather, from garments or leather items (including a soft-sided briefcase).  I trimmed the leather using my rotary cutter, making strips that were 1" wide.
Trimming butter-soft brown leather that was once a jacket sleeve.
I rounded one end of each strip with scissors, then used my Japanese screw punch to put three tiny holes in in each strip, about 1" from the rounded end.

A Japanese Screw Punch is a great tool for leather work, book making and other hobbies.
The screw bits come in various sizes; this one is 1.2 mm.  
 Softflex beading wire is my stringing material of choice for natural stone or glass beads.  I cut three pieces of wire, and inserted them through the holes.  A small seed bead and a micro crimp bead secured them to the 'wrong' side of the leather.
A clamp on one end keeps the beads from falling off.

After stringing on the stones, I attached the other end of the wire to the second strap in the same manner.  A little E6000 glue on the end was a little added insurance that everything would stay together.  

After determining the finished length of the necklace, I trimmed the excess leather and added a 1" ribbon clamp and a clasp.  

My mind is racing with other stone, metal and color combinations that I can put together to make more of these statement necklaces!  


Sunday, September 22, 2013

Time for a little "Boo!"

The weather here has turned cooler, and today is the first day of Fall.  Halloween is little more than a month away, and I found the perfect beads for a scary little project!


The Pennsylvania Quilt Festival was at the convention center in Oaks, Pa., this weekend, and in the same complex, the International Gem and Jewelry Show had set up.  Woo-hoo!  Two things I love under one roof!!

On a short run through the gem and jewelry show, I spied these cute beads.  They are made of dyed howlite.  I've seen skulls before, but not pumpkins or sliced skeleton faces.  And they were cheap!  Only $2.00 for a strand of 16 beads!  I quickly snatched a strand of each.


Turning the beads into earrings was easy.  The skeleton faces were threaded onto headpins.  I made a wire-wrapped loop at the top of each and slipped them onto french hook earring wires.  For the pumpkins, I added a small, fire-polished Czech glass bead to make a 'stem'.

Including the findings, each pair cost me under $1.50 to make!

I've already given one pair as a gift...and have a few more set aside for family and friends.  Just looking at them makes me smile.  I can't wait to wear them in October!


Saturday, September 14, 2013

Knotted Pearls with a Twist

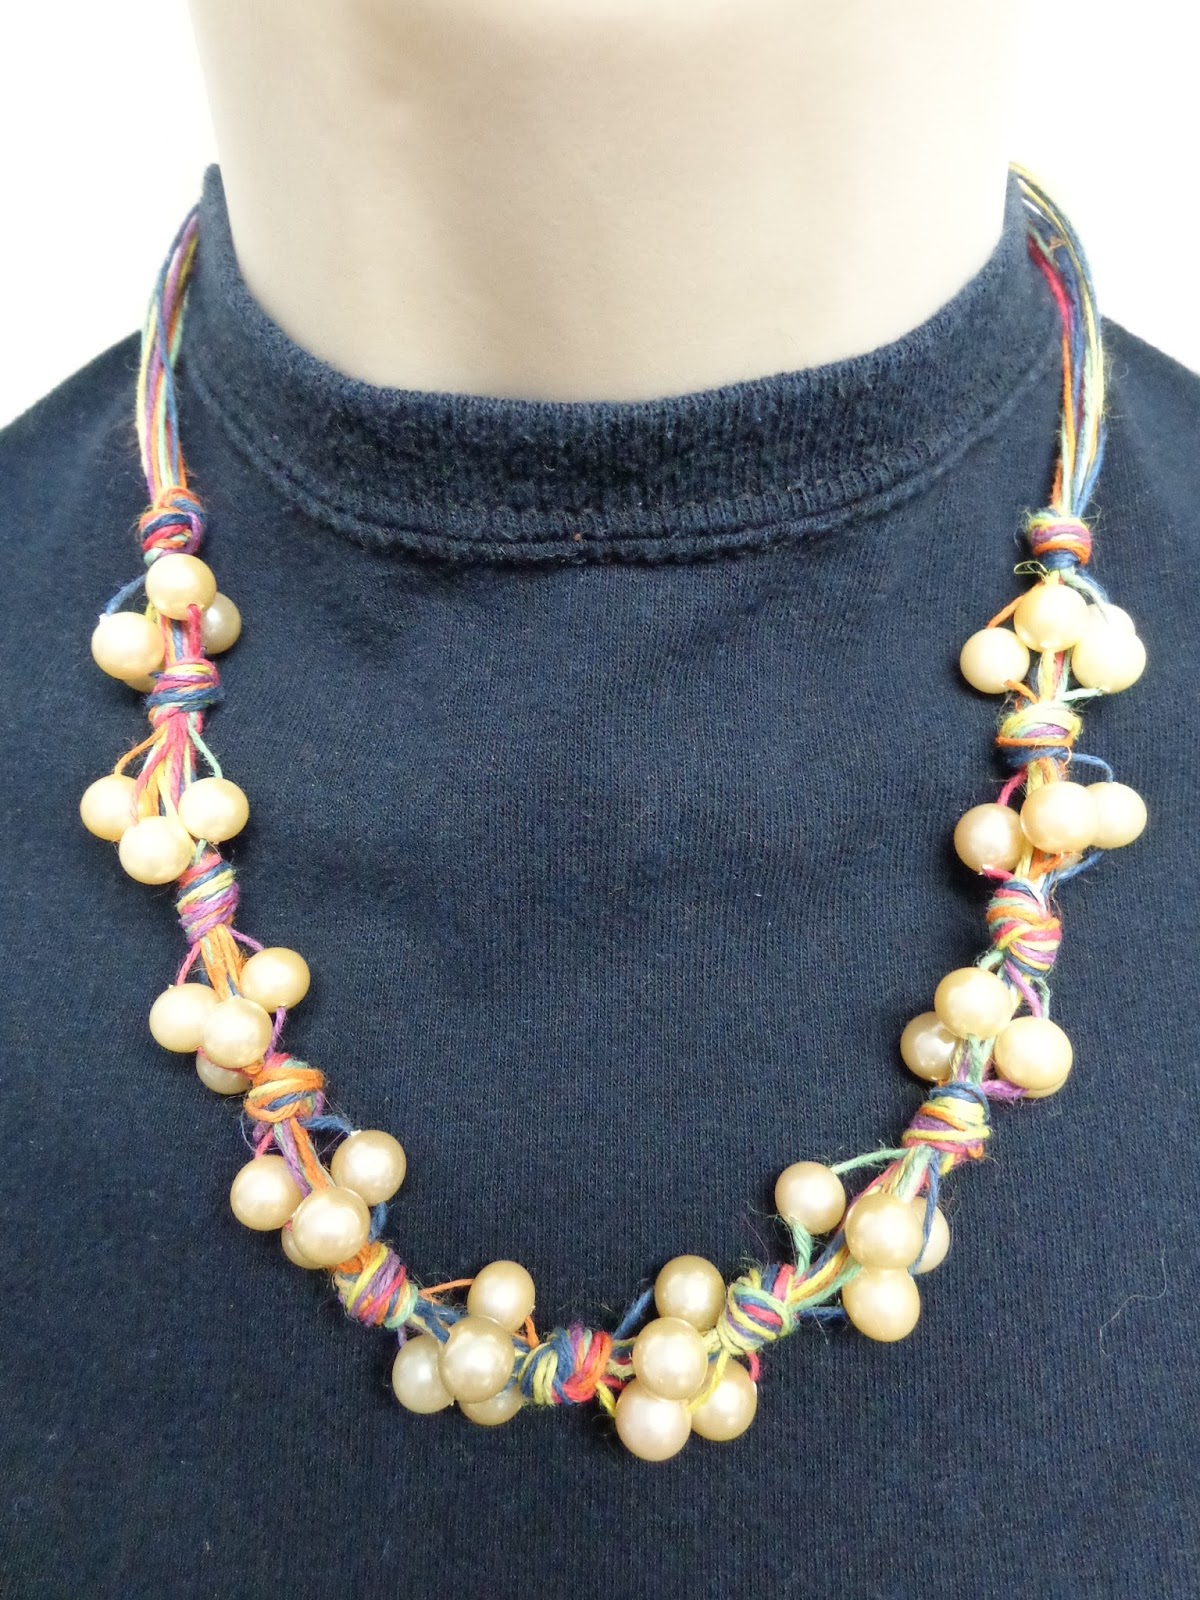
A customer came into the little shop where I work (The Bead Garden, Havertown, Pa.) in search of supplies for Christmas gifts.  Yes, if you like to give hand-crafted Christmas gifts, now is the time to begin working on them!  Her plan was simple:  buy enough large, glass pearls in varying colors to make 30 necklaces of the same design.  She had purchased a necklace while on a trip to Italy, and wanted to 'copy' it for her friends. To find the supplies she needed, I examined the necklace, and knew I'd have to try one myself.


The concept is pretty simple -- using 6 seven-foot lengths of very fine hemp cord, you make overhand knots between clusters of four beads.  The necklace can look casual or dressy, depending on your choice of beads.

Here's a quick lesson:


I selected a fine hemp (also called 'jute') made by Darice.  It comes in a variety of colors, but for this necklace, I used a varigated rainbow pack.  I cut 6 pieces of hemp, each seven feet long.  I tested the beads to be sure I could the string them onto the hemp.  To make that easier to do, I first hardened the last two inches of each strand of cord with brush-on super glue.


Do this over a piece of paper, so glue doesn't get everywhere, and give it at least 20 minutes to dry thoroughly.  Some cords were a bit thicker than others, so I trimmed the end of the cords at an angle so they would slide through the beads.    

Fold the cords in half and create a loop for the 'clasp' end by making a knot the correct size for the closure.  I intended to use a larger pearl for my 'clasp,' but a button would work, too.
 

The next knot was made about 5 inches down the cords.  This space allows the necklace to lie flat against the back of the neck.  (This is also a good idea if you have a limited number of beads -- why use them where no one will see them??)

Now, separate out four of the strands, thread one bead on each strand, and push all four up to the knot just created.  I left a little bit of space between knots, so the beads can move a bit.
 

Just below the cluster of beads, create another over-hand knot.  Push it up to the base of the cluster and tighten it.  I had to tug some cords individually to keep the knot from getting 'loopy.'

Select four cords from the bundle and string on four more beads, pushing them to the base of the previous knot.  Create another overhand knot and tighten it.  Repeat the same process until there are several clusters of beads.  (I made 10 clusters on my necklace, which had a 18" finished length.)  Note:  after each knot, pick out four cords from the bunch to string the beads onto -- the process of knotting the cords makes it impossible to thread beads onto the same string every time.  Don't pick cords next to each other...spread them out a bit.

To end the necklace, make a knot under the last cluster of beads, and then make another knot about 5 inches from the previous one (remember, that part goes around the back of the neck).

Separate one or two cords out and run them through the closure bead/button.  Gather all of the threads and tie one more overhand knot snug against the closure bead.  Snip all of the cords about 1/4 inch beyond the closure and brush them with super glue to keep the knot secure and the thread from fraying.
 

My necklace was made using 10 mm glass ivory glass pearls, which I had on hand.  Can you imagine this made up using much larger 16 mm maroon or teal glass pearls with natural hemp?  It would be a statement piece!  My customer spent about $200 for supplies that will create 30 necklaces -- gifts that will look much pricier than $7.00 each to create!


Thursday, June 13, 2013

A little D-I-Y gift for the bridesmaids...

A lot of people look to D-I-Y gifts as a way to save money and provide a personal touch...and in this case, I think we accomplished both! 

My future daughter-in-law, Mary, bought a cute stretch bracelet on Etsy a few months back, and then decided that she wanted to make similar ones for the members of her wedding party and a few close friends.    She visited The Bead Garden in Havertown, Pa., one afternoon (when I was not working), and spent an hour with the owner, Leslie, designing the bracelets and selecting the supplies we would need to finish the project. 
Violet crystals, pave crosses and Stretch Magic is all it take!
Of course, we had to order some supplies, and unfortunately, couldn't find a wholesale source for the crosses Mary wanted to use.  Luckily, I found them on Etsy and ordered what we needed. With everything delivered this week, we finally had a chance to sit down and work on them.  

There is one thing about making bracelets for someone else -- they are tough to fit if you don't know the recipient's wrist circumference.  After some discussion, we decided to make a variety of sizes, and Mary will have the girls try them on and swap if they need to have a better fitting bracelet.  Also, making them using stretchy cord will help.
This size fits me -- and I have a large wrist!
Mary selected silver crosses and infinity symbols embedded with clear pave crystals.  Then she picked out tanzanite-colored Preciosa crystal beads to coordinate with the bridesmaids' dresses. Her flower girl's bracelet is in pink pave crystal with clear Swarovski crystal.  The bracelets were strung on .7mm Stretch Magic elastic cord.  I incorporated two silver-plated 4mm round beads to cover the knots.     

Together, I think Mary and I created a beautiful, D-I-Y gift that the girls will enjoy.  And we did it for about $4.15 each -- half the cost of purchasing them through Etsy.


That's D-I-Y done right!    

Wednesday, February 20, 2013

Another "Charming" Project

I can't believe it's almost the end of February! The days seem to be rushing by, but that's o.k., because it means Spring is on the way soon!

I did 'lose' a few days last week...my dear brother-in-law's father passed away on February 3, and although his dad had spent several decades in the western United States, he was buried in his home town of Spencer, West Virginia.  My d.h. and I decided to make the trip so my brother-in-law, sister and nephew would have some family with them during this difficult time (he is an only child).

My sister made reservations for all of us at a lovely bed-and-breakfast, The Cunningham House. Spencer is south of Morgantown and north of Charleston, and there are no hotels in the town.  
 
Ruby Bradley
The Cunningham House is one of two Bed and Breakfast inns in Spencer.
The owners, Sonny and Sherry, were gracious hosts.  In the late 90's, they purchased, gutted and restored the house to it's turn-of-the century glory, but added a private bath for each guest suite. Their website seems to be down right now, but you can contact them at 304-927-2022 if you're interested in staying there sometime.  Spencer hosts a Black Walnut Festival in the fall every year (http://wvblackwalnutfestival.org) and there are two vineyards within a short drive of the town.

Before we left Philadelphia, my sister called and asked me to bring my jewelry tools along because she had a few things that need to be fixed.  I did some on-the-spot repairs for her, but one project needed to come home with me to finish up.

She had collected a number of heart charms, and a couple of inexpensive cameos, and was wearing them clumped together on a chain.  What she really wanted was to space them out somehow, so you could see each charm.  A long chain was included in the pile, so I decided to use that for the re-make.

While I could have hung each charm from the chain with a jump ring, like I did with the religious medal necklace featured in a previous post, I decided to use some gold-plated beads for spacers. The holes were large enough to string onto the chain, and by using two between each charm, there is just enough room for the charms to hang free but still be close enough to jingle a bit when she wears it.


While you wouldn't classify this as 'fine' jewelry, it's a fun piece to wear and show off a collection of similar charms.  Best thing is that we recycled bits and pieces of jewelry to make something new!

Thursday, February 7, 2013

A little Valentine

St. Valentine's Day is just a week away and it's time to start thinking about making a little gift for the people you love in your life.

(Did you notice that I said SAINT Valentine's Day?  I think people have forgotten that February 14 is the feast day of St. Valentine...not purely a Hallmark holiday.)

I digress.  Back to making a little gift for someone you love.

Here is a simple bracelet that will take an experienced beader just 15 or 20 minutes to put together; a newbie can finish it up in about 30 minutes, with a little help.


I used red rondelle crystal beads, with gold beadcaps, strung on Softflex beading wire for one half of the bracelet.  To give the beads some 'breathing room,' I added a size 11 seed bead between each crystal unit.

I crimped one end of the beading wire to an open jump ring and added a lobster claw clasp.  The other end was crimped to about three inches of chain to complete the bracelet.  I covered the crimp beads with gold-plated crimp covers to give it a finished look.

Selecting the charms was the fun part!  Most were attached with open jump rings, except for the red crystal ball.  I used a headpin and two small gold beads on the top and bottom, then attached it to the chain with a wire-wrapped loop.  There are ten charms on this bracelet, but it can be made with fewer.  Depending on the number of charms and the cost of each, a bracelet like this can be made for between $10 and $20 dollars.  (All of my supplies came from The Bead Garden (www.thebeadgarden.com), my local bead store.)

Don't you think it's charming?


Tuesday, February 5, 2013

Oops! Let's try that again!

You may remember that I made my beautiful daughter three necklaces out of a strand of coral beads she purchased.

Unfortunately, she really didn't like one of them...the silver one with smaller, coral beads.  If you don't remember it, this is what it looked like.


For years she wouldn't wear anything except silver jewelry, but now she seems to like gold better.  Plus, she thought it was a little short.

So, I cut it apart and started over (one of the benefits of knowing how to make jewelry!). I was lucky to have three beads that were left over from the previous necklaces.  Those were incorporated into the new design.

I used 18 inches of gold-filled chain, and wire-wrapped each bead directly onto the chain, or to the bead above it, which was then wire-wrapped onto the chain.

I'm happy to report that she liked this design much better!!

So the moral of the story is...if at first you don't succeed, try, try again!

Sunday, February 3, 2013

Skeleton Keys are Hot!

Old-time skeleton keys are hot on the jewelry scene right now!  It's a fun and easy way to incorporate 'steampunk' style into jewelry.

Recently, Leslie at The Bead Garden (www.thebeadgarden.com) got some in the store, and we both were itching to make up samples using the keys.

Instead of hanging my key vertically, I decided to wire it horizontally to chain, to act as a cross bar.

I added more chain below the key and brought the two ends together by wiring on the fish 'heart' bead.  A ring hangs below the heart, giving me a place from which to dangle shorter pieces of chain and charms.  .
Deciding which charms and beads to use was tough!
 I varied the length of chain for each charm, so they  had some 'breathing' room.  
After 30 minutes, my necklace was complete!  You can make one just like this for under $15!

I stuck to a mono-chromatic palette, but Leslie used color to make her keys pop. Go to her facebook page to see her design (http://www.facebook.com/pages/The-Bead-Garden/151078615990).  And, if you're local, stop in to pick up the supplies to create one for yourself!

Monday, December 10, 2012

Using One Strand of Beads to Create Three Necklaces

Not too long ago, my daughter and I went to a bead show.  As we browsed the tables, looking a beads and findings, she spied a strand of chunky red coral beads.  She had been searching for a red necklace, and liked the look of these beads, but she didn't have an idea about how to use them. 

Five minutes later, I won an attendance prize -- a $15 gift certificate good for any vendor in the show!  That $14 strand of coral was suddenly 'free'!   

Beads are typically sold on a 16 inch strand, strung on cheap fishing line.  There were 24 coral nuggets on this strand, but my daughter didn't want to simply restring them on beading wire or knot them with silk cord. 

I have a binder of beading ideas that I clipped from magazines and catalogs, and I started my search for ideas there.  This first necklace was based on a design by Jennifer Judd Velasquez, which appeared in Stringing Magazine in the Summer 2009 issue.

 
I used silver-plated chain and some smaller 'rice' shaped coral beads I had in my stash.  I added the 2 mm silver balls between each bead to give them some breathing room.  The beads are strung on a short piece of beading wire, which I crimped to the chain.  The finished neckace is 16.5 inches long.
 

 The second necklace is done up in gold tones, with small, freshwater pearls and vermeil spacers between the coral nuggets.  It looks a little 'dressy.'  I took my inspiration from a similar design by Patricia A. Henry.  Her "Royal Jasper" necklace appeared in the Winter 2007 issue of Stringing Magazine.  The beads toward the back resemble 'paper' beads, but are gold plated.  This necklace is a little longer, with a finished length of 22 inches. 

The final neckace I created with the coral nuggets also resembles a piece found in the Winter 2007 issue of Stringing Magazine (designer unknown).  I love mixing chain with beads, and this allowed me to create a longer necklace using just a few beads.  I used gun metal colored chain in two styles, and picked up some antique silver filiagree beads to help balance the coral.  Although the coral beads are bright red, using the slightly larger silver beads gives them equal weight.  It is hard to see in this photo, but I used 4 mm black Swarovski crystals between the red beads, and 6 mm crystals between the silver beads.  They add just a bit of sparkle to an otherwise 'flat' piece.  I didn't put a clasp on this necklace, because it is 26 inches long.  My daughter wanted a longer piece to wear with sweaters.   
 
 
After finishing all three necklaces, I still had three beads left!  I'm sure I'll find something else to do with them.  And, instead of having just one red necklace, my daughter has three from which to choose, each with its own character -- flirty, formal and fun! 


Monday, December 3, 2012

More Craft Room Organizing Ideas

Take a peek into my studio...rest assured, it doesn't always look this tidy!

I promised more organizing ideas for your craft supplies, but I guess I'm really just sharing what works for me. 

First of all, I am very fortunate to have a room to call my own.  That wasn't always this case in this house.  For the first several years here, all of my supplies were in boxes in the attic, and my sewing machine was put up and taken down many times a month.  When we finally started working on the basement, I was able to carve out some space for a sewing room, and was happy down there for several years. 

But my four children grew up, and the youngest boys weren't so keen on sharing a room when they were home from college, so I gave up my sewing room for my son, and my husband and the boys started roughing out a space for me in the attic. 


My studio is 10 feet by 15 feet, but has sloping ceilings along the 10 foot walls.  I have two windows on the wall facing the street, and a door in the opposite 15 foot wall.  While I would love to have floor to ceiling shelves on all four walls, the sloped ceilings prohibit that, so I've had to make the best of the space.  On the wall between the windows, there is a large computer desk. My embroidery thread racks are up top, along with binders of beading, quilting and sewing projects that I have kept from magazines. I have space for my laptop, and some storage underneath. 

 On the right side of the room, I have a full size dining table, including the leaf, as a cutting/work table.  I used bed risers to make it the right height.  There is plenty of space underneath for Rubbermaid bins (mostly fabric storage) and a bookshelf and plastic drawers provide storage for smaller items. The plastic shoe boxes hold rubber stamps and other craft supplies.  Even though they are clear, I still label everything.    


On the left side of the room, I have two hand-me-down dressers.  The one on the left holds beads
and jewelry making supplies, with the bottom drawer filled with scrapbooking paper and dies for a Cuttlebug die cutting machine.  The one on the right has a whole drawer for buttons, pressing tools, glues and other adhesives, book-binding supplies, and larger sewing equipment.  On top is a two-drawer antique thread box that was my grandmother's.

My sewing table is an island in the center of the room, with space to walk around it on both sides.  It is a little over 6 feet long.  I bought this at Ikea about 20 years ago.  The base is made up of two cabinets -- one has double doors, the other has a single door.  I keep a lot of sewing supplies in these cabinets -- again, stashed in clear shoe boxes, so I can find zippers, velcro, bias tape and cone thread easily.  I keep the sewing notions that I use frequently in that small brown tackle box on top of my sewing table.  It's within easy reach of my machine. 
 Across from my sewing table, next to the door, is a tall bookshelf.  Plastic bins hold more sewing and embroidery supplies, the pizza boxes and binders hold rubber stamps, two other tackle boxes hold beading tools, and there is space on the shelves for some scrapbooking supplies. 

There is another, small bookshelf to the left side of the door, which holds 30 quart Rubbermaid bins of quilting fabrics, t-shirt knits, patterns, and antique linens and laces.

Yes, I've labeled just about everything.  That is the hardest part about moving into a new space...things are not where they used to be.  Although I found a place for everything, I don't want to spend too much time looking for my supplies, so I labeled as much as I could.   
My dear husband (d.h.) had made me two large pegboards for my basement sewing room, but I just didn't have the wall space for them in the attic.  So he kindly offered to cut one down for me, and you see it fits nicely around the window.  (The other one somehow ended up in his workroom!)

I picked up the clear plastic pegboard shelves at two different stores that were going out of business.  These hold ribbons (at the very top), some rubber stamps, punches and scissors, embossing powders, and other papercrafting supplies. 

There are few other things in the room.  A small wooden bookshelf holds sewing, beading, stamping and craft books.  You saw my carousel for rubber stamps and ink in the last post; I also have an Iris cart with other small stamps tucked between the dresser and the bookshelf.  And I have the rocker I bought when my oldest was born, right next to the computer desk.  It's important to have a place for visitors to sit in the studio, because someone is always popping in to chat while I work (or while they are waiting for me to finish mending something for them).  One last little cabinet holds my special things. 

My grandfather was a skilled carpenter, and he built this child-sized cupboard for my mother when she was a girl.  When I was little, my brother painted it white and gave it to me on Christmas.  I played with it for many years, and after I moved out of the house, my mother used it in her sewing room.  I inherited it when she died.  It holds many little sewing related knic-knacs, including my grandmother's sewing basket.  Behind the upper doors are music cd's.  The drawers and lower cabinet are used to store keepsakes and supplies for my letterboxing hobby.

I hope you enjoyed this little tour of my studio, and picked up a few ideas to incorporate into your own crafting space, no matter how big or small.  If you will indulge me, I'd like to reiterate:  label as much as you can, so you don't waste precious time looking for what you need.  Then you'll have more time to craft! 

Now, go make something fast!

Wednesday, October 24, 2012

My "Bless Me and Protect Me from Evil" Necklace

or, what to do with all of those old religious medals.


A while back, I created a one-of-a-kind necklace for myself that generates a conversation whenever I wear it.  I took 15 old religious medals (that kind generally worn by faithful Catholics), spaced them out, and hung them from a brass-colored chain with large links.  I picked out different shapes and sizes, some from my grandmother and mom, others that I had collected along my way in life.  Its longer length is great to wear with sweaters, and I really like that is jingle-jangles.  I call it my "Bless Me and Protect Me from All Evil" necklace. 

Here's a brief tutorial on how you can make one!

First, collect all of the medals you have (or can get your hands on).  Looks a flea markets, thrift stores, and through the drawers and jewelry boxes of relatives and/or friends.  Let people know you're looking for them, and you'd be surprised how many you'll get!  You may have to pay a couple of dollars each for them at a flea market, but don't be afraid to bargain!


Sort through the medals and select the ones you'd like to use -- you can pick a theme (one of mine has medals featuring the Blessed Virgin Mary, another is made up of only saints), or stick to a color (silver, brass, gold), or make a mixed metal necklace, which is what I prefer.  I like to select unusual shapes -- crosses, ovals, cut-out medals, squares, etc.  Lay out your medals in a pleasing manner.  This necklace has the largest medal in the center, and each one is a bit smaller working out to each side.  I have put smaller medals next to the large one in the center on occasion...it helps fill in the gaps created by very large medals.
You'll need 21 inches of chain, and one jump ring for each medal, plus two for the clasp.

The center medal is a 'book' that opens!
I select a chain with larger links in a 'neutral' color, usually gun-metal grey or brass.  I buy this by the inch/foot at The Bead Garden, in Havertown, Pa., (www.thebeadgarden.com ) which is my local bead store.  These necklaces are 21" long.  You'll also need jump rings -- these are the little round or oval-shaped rings that can open with a pair of chain nose or round nose pliers.  Start in the center of your necklace.  Open a jump ring, slip on the medal, and slip the jump ring through the center link on your chain.  Close the jump ring.  A note about opening and closing jump rings:  jump rings are in a nice, round circle.  Don't pull the cut ends away from each other and distort the circle.  Instead, use the pliers to hold one side of the ring, and use your thumb to push the ring down and away from you, until you have a big enough opening to slip on the medal.  Then, use your fingers (or a second pair of pliers) to pull the ring back up toward you, until the cut ends are even and touching.  Some medals may already have a jump ring on them...you can use it, but I replace them so all of the jump rings are the same.

 
Depending on how big your center medal is, you'll want to count over a few links to hang the next one.  In the photo above, I hung the next medal four links over to the right, and then the third four links over to the left of center.  After I put on each pair of medals, I hold the chain up and see if the placement is good -- I want the medals to be separate, but still clink together when the necklace is worn.  Continue adding medals, right and left, until all of them are on your chain.
  
The last thing to add is a clasp.  I prefer a hook and a jump ring ...it's easy for me to do myself.  The weight of the medals will keep the necklace from coming undone while you are wearing it. 
 
That's it!  You have a one-of-a kind piece of jewelry, with a little added protection from above (we hope!).