Saturday, November 2, 2013

A Vintage Singer Sewing Machine Gets a New Life


Several years ago, I saw one of these lamps and admired it quite a lot.  I always hoped that someday I'd be able to own one.  When I stumbled across a vintage Singer sewing machine at a flea market a few weeks ago, I jumped at the chance to make my own lamp.  The man wanted just $20!

One of the great things about vintage Singer sewing machines is that you can use the serial number to search for the year the machine was manufactured. (www.singerco.com/support/machine-serial-numbers)


This serial number indicated that this model was made in 1925.  Imagine...a machine that's nearly 90 years old!  What is really surprising is how great the gold graphics still look!

The challenge was how to attach a light fixture to the back of the machine.  Luckily, this model already had a small work light on the back.

I was able to unscrew the work light from the machine and disassemble it.   Once I took it apart, I realized I could use the bracket to attach the new lamp to the machine, and the black base was threaded and would hold the new pipe.

The hardware store had a lamp re-wiring kit and a white silk shade.  I had to buy a threaded pipe and a nut separately.  The entire bill was about $40.  After cutting the electrical cord of the old lamp, I ran the new wiring along the same path..  I changed the position of the lamp bracket from horizontal to vertical, and followed the instructions on the back of the lamp kit to thread the pipe, attach the socket base, wire the socket and add the harp, shade and light bulb.  

The new threaded pipe fit snugly into the existing hardware, but I did
turn the bracket 90 degrees to hold the lamp upright.
Next, the sewing machine got a bit of TLC.  I dug out the brass polish, Orange Glow wood cleaner/protector and good ole' fashioned Johnson's paste wax to shine up the metal case of the machine. I also added felt pads on the bottom of each corner of the wooden case, to prevent scratching the furniture.

Time for a little clean up!
Although I'm not generally very mechanically inclined, the step-by-step instructions on the lamp re-wiring kit were easy to follow and I'm proud of myself for finishing this without any help from my d.h. (truth in reporting here -- I did have my son tighten the nut and screw on the bracket holding the pipe...I just couldn't get it quite tight enough!).  The moral of the story -- don't be afraid to re-purpose something neat into a lamp!

My vintage Singer sewing machine lamp!
[After taking another look at the photos of the lamp, I realized the shade didn't cover the base of the socket.  For $4, I bought another harp, two inches smaller than the one pictured, and swapped it out...that solved the problem!]


Tuesday, October 15, 2013

A Walk in the Fall Leaves, Made Possible with Rubber Stamps

It's a beautiful time of the year for a walk in the woods, and the changing leaves make the perfect backdrop for a glorious fall wedding!


My nephew and his bride were married in upstate New York in late September, and their reception was held in a picnic pavilion near a lake.  This card was inspired by that unique venue.  It's been a while since I did any rubber stamping, but a stamp set I picked up a year ago was perfect for the theme.

Designed by Kittie Caraccido, "Kittie Kits - Cause a Scene" are manufactured and sold by Rubbernecker Stamps (www.rubbernecker.com).   This kit was Scene 9, and contains 43 stamps.

Some of them are what I call a "micro-stamp," a single image that is very tiny, like one falling leaf or an ear of corn.  The kits are designed for scenic stamping -- creating a 'picture' using the various bits and pieces.

Obviously, for a wedding card, I needed a bride and groom, and found the happy couple in my binder of cling mounted rubber stamps.  The stamp is by Another Stamp Company, and came in two sizes (www.anotherstampcompany.com).  I used the small size for this card.  (By the way, most of the stamps I buy now are cling mounted...they store in binders and take up less space in my studio.  I have acrylic blocks in a variety of shapes to use with them.)  I also found a couple more stamps to incorporate into the scene in my stash.

To begin, I stamped out the scene on scrap paper to determine what would be in the foreground and what elements would be in the background.  Then each image was stamped onto a post-it note or masking paper (a thin, white paper that is covered with the same low-tack adhesive as post-it notes) and trimmed out carefully.  These 'masks' will allow me to stamp over an image, without having the lines of the second stamp show up on the first image.  The image in the foreground is stamped first, then masked, and the images in the background are stamped next. (For more on masking go to http://simplydevinecrafts.blogspot.com/2012/09/a-tutorial-on-rubber-stamp-masking-i.html )  Using black ink, I stamped the bridal couple and the farm stand first, layered the masks over those two images, then overstamped the walking path, trees and pumpkins.  The grass, leaf piles and sand were added next, and to finish the scene, I stamped a cluster of leaves over the trees several times, using an 'Autumn Leaves' Kaleidacolor ink pad.
The scene was stamped on a half-sheet of 8.5" x 11" cardstock.
Now comes the fun part -- coloring!  I worked a rubber stamp show for a company last year, and asked them to 'pay' me with Copic markers.  I have 56 colors, and I'm still playing with them, trying to improve my technique.  I decided to use them (instead of Prismacolor pencils, my other favorite coloring tool), and started with the leaves on the trees.

Ultimately I used six different colors for the leaves.  The farm stand and pumpkins were colored next. The grass created a challenge, because most of my green markers are pretty vibrant, but I discovered that lime and light olive, together with grass green, looked pretty good.
Copic markers blend well with each other. You can go over the same place with a different color
to achieve a realistic look.  
Without a sand colored marker, I opted to use the Prismacolor pencils to color the walking path.  Here's a technique I learned just last year -- Gamsol, an odorless mineral spirit, is great for blending pencil coloring.


'Before' using Gamsol


In the first picture, you can see the 'scribble' lines of the three pencils I used.


Using a rolled paper stub, I applied Gamsol to the coloring, rubbing it in a circular motion.

It blends the colors and brightens them somewhat.  I was happy with the way the path looked when I was finished.


'After' using Gamsol.
 

The final thing to color was the sky.  For some reason, coloring skies always trips me up.  It's hard to come up with the right shade of blue, and I debate whether to put in some clouds for good measure.  Coloring a sunset a bit easier, but that's not the look I was going for here.

Thankfully, Copic has a color called 'Cool Shadow.'  It falls on the blue-green spectrum, but it was just perfect for the sky on this fall scene.  

To finish the card, the panel was trimmed to 4.25 x 6.25 inches, mounted on a patterned paper, and then affixed onto a 5 x 7 inch card.  I added the sentiment "...and they lived happily ever after...' to the inside of the card (stamp by Another Stamp Company).

Doesn't it look like a nice day for a walk in the falling leaves?

Sunday, September 22, 2013

Time for a little "Boo!"

The weather here has turned cooler, and today is the first day of Fall.  Halloween is little more than a month away, and I found the perfect beads for a scary little project!


The Pennsylvania Quilt Festival was at the convention center in Oaks, Pa., this weekend, and in the same complex, the International Gem and Jewelry Show had set up.  Woo-hoo!  Two things I love under one roof!!

On a short run through the gem and jewelry show, I spied these cute beads.  They are made of dyed howlite.  I've seen skulls before, but not pumpkins or sliced skeleton faces.  And they were cheap!  Only $2.00 for a strand of 16 beads!  I quickly snatched a strand of each.


Turning the beads into earrings was easy.  The skeleton faces were threaded onto headpins.  I made a wire-wrapped loop at the top of each and slipped them onto french hook earring wires.  For the pumpkins, I added a small, fire-polished Czech glass bead to make a 'stem'.

Including the findings, each pair cost me under $1.50 to make!

I've already given one pair as a gift...and have a few more set aside for family and friends.  Just looking at them makes me smile.  I can't wait to wear them in October!


Saturday, September 14, 2013

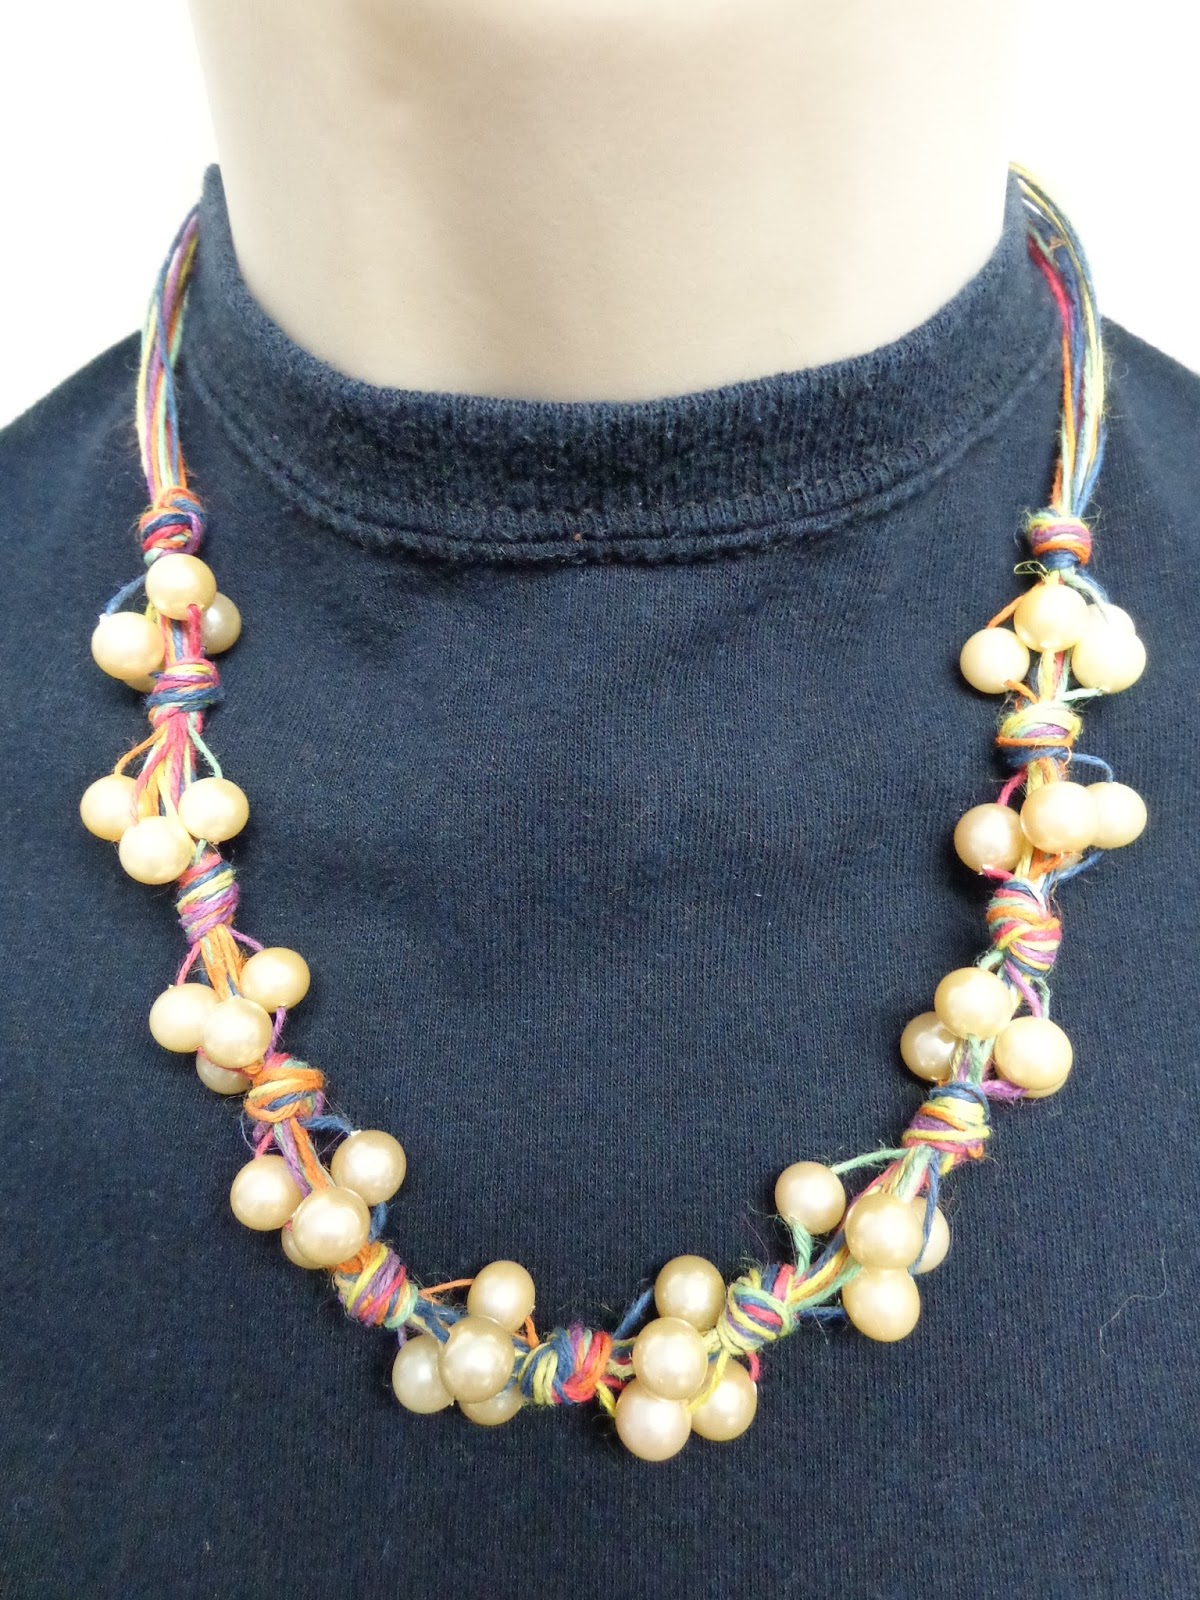
Knotted Pearls with a Twist

A customer came into the little shop where I work (The Bead Garden, Havertown, Pa.) in search of supplies for Christmas gifts.  Yes, if you like to give hand-crafted Christmas gifts, now is the time to begin working on them!  Her plan was simple:  buy enough large, glass pearls in varying colors to make 30 necklaces of the same design.  She had purchased a necklace while on a trip to Italy, and wanted to 'copy' it for her friends. To find the supplies she needed, I examined the necklace, and knew I'd have to try one myself.


The concept is pretty simple -- using 6 seven-foot lengths of very fine hemp cord, you make overhand knots between clusters of four beads.  The necklace can look casual or dressy, depending on your choice of beads.

Here's a quick lesson:


I selected a fine hemp (also called 'jute') made by Darice.  It comes in a variety of colors, but for this necklace, I used a varigated rainbow pack.  I cut 6 pieces of hemp, each seven feet long.  I tested the beads to be sure I could the string them onto the hemp.  To make that easier to do, I first hardened the last two inches of each strand of cord with brush-on super glue.


Do this over a piece of paper, so glue doesn't get everywhere, and give it at least 20 minutes to dry thoroughly.  Some cords were a bit thicker than others, so I trimmed the end of the cords at an angle so they would slide through the beads.    

Fold the cords in half and create a loop for the 'clasp' end by making a knot the correct size for the closure.  I intended to use a larger pearl for my 'clasp,' but a button would work, too.
 

The next knot was made about 5 inches down the cords.  This space allows the necklace to lie flat against the back of the neck.  (This is also a good idea if you have a limited number of beads -- why use them where no one will see them??)

Now, separate out four of the strands, thread one bead on each strand, and push all four up to the knot just created.  I left a little bit of space between knots, so the beads can move a bit.
 

Just below the cluster of beads, create another over-hand knot.  Push it up to the base of the cluster and tighten it.  I had to tug some cords individually to keep the knot from getting 'loopy.'

Select four cords from the bundle and string on four more beads, pushing them to the base of the previous knot.  Create another overhand knot and tighten it.  Repeat the same process until there are several clusters of beads.  (I made 10 clusters on my necklace, which had a 18" finished length.)  Note:  after each knot, pick out four cords from the bunch to string the beads onto -- the process of knotting the cords makes it impossible to thread beads onto the same string every time.  Don't pick cords next to each other...spread them out a bit.

To end the necklace, make a knot under the last cluster of beads, and then make another knot about 5 inches from the previous one (remember, that part goes around the back of the neck).

Separate one or two cords out and run them through the closure bead/button.  Gather all of the threads and tie one more overhand knot snug against the closure bead.  Snip all of the cords about 1/4 inch beyond the closure and brush them with super glue to keep the knot secure and the thread from fraying.
 

My necklace was made using 10 mm glass ivory glass pearls, which I had on hand.  Can you imagine this made up using much larger 16 mm maroon or teal glass pearls with natural hemp?  It would be a statement piece!  My customer spent about $200 for supplies that will create 30 necklaces -- gifts that will look much pricier than $7.00 each to create!


Saturday, August 17, 2013

A little 'Fascination'!

My hand-crafted clip-on feather fascinator.
My daughter was eyeing up a white feather fascinator in a little shop in Maine during our recent trip, but the price tag (about $30) landed it quickly back on its display.  Fascinators are the tiny little headpieces made fashionable by Her Royal Highness, the Duchess of Cambridge (otherwise known as Princess Kate). They are becoming popular here, too.

Philadelphia's 'Diner en Blanc'  is coming up soon, and my daughter is a table coordinator.  This is a fun, magical night under the stars for which Philadelphians pack their own dinner, bring their own chairs and tables, and wait until a late afternoon phone call that tells them where the “secret” dining location is.  Over a thousand people dress in white to take part in the pop-up culinary event. 'Diner en Blanc' picnics began in Paris two decades ago and are now taking over elegant public spaces in 22 cities around the world.

We bought my daughter white folding chairs and a roll-up camping table for her birthday, and she is assembling two place settings, a white table cloth and a centerpiece for the evening.  She has a white dress and comfortable shoes (because you walk or take public transportation to the event), but wants to jazz things up a bit, and a white fascinator would add a bit of style to the evening.

Mom to the rescue!

On a quick run to the craft store this week, I snagged a stem of silk mums and a stem of white feathers.  Total cost:  $5.00.  I found some 'bling' in my stash of jewelry supplies.  It was just a matter of assembling the parts.
The headband, ribbon and Pellon Peltex I already had in my stash...the only purchase were the flowers and feathers.
E6000 glue is my adhesive of choice when it comes to these kinds of projects.  It's good for metal, plastic, beads and fabric.  It stays flexible and dries clear.  The first thing I glued was the rhinestone button into the center of the flower.

A rhinestone button adds just the right amount of bling!
For the foundation, I used Pellon Peltex 70, an ultra firm, smooth and resilient stabilizer for accessories and crafts.  I glued two pieces together and cut it into an oval shape.  I punched a hole in the top of the foundation piece to insert the stem of the silk flower.


The feathers needed a little trimming before I glued them onto the Peltex.  I laid them out first, so I would know how long to make them and which feather would be glued down first.  I topped the feathers with another piece of Peltex, and clamped them for about a half an hour to secure all the pieces together.  Then I glued the hair clip to the back of the foundation.


The last thing to be glued in place was the flower.  I wasn't sure if she would prefer a hair clip or a headband, and I had enough supplies to make another, so I made one of each.  I'm sure she'll find someone with whom to share the other fascinator!  
The headband version of the fascinator.
Both pieces were assembled in about an hour, and cost just $2.50 each!  Can't wait to see pictures of the event!


Tuesday, August 13, 2013

Maine Road Trip: How Many Quilt Shops Can I Visit in a Week?

The answer to that question is:  not all of them!

When my daughter and I began planning a road trip to Maine for vacation, I did a web search to find fabric stores, bead shops and rubber stamp stores along our route, hoping to stop in a few and see what different items they would have that I can't get locally.  Yes, it's feeding my three favorite hobbies, but in addition, I'm trying to support small, local businesses.  If we don't shop locally, soon there will be no small retailers left.  Additionally, shops in vacation destinations do a seasonal business -- they probably make 75% of their income during the summer (or winter) months, when tourist dollars are being spent.  So, I needed to do my share!
My daughter, Kaitlin, and me in Bar Harbor, Maine.
I found a website that had a map of quilt shops in Maine (http://www.maineshophop.com/Home_Page.html -- go to the printables page for the map). After deciding our itenerary (a 'foodie' walking tour of Bar Harbor, a whale watching boat trip, etc.), I mapped out, from North to South, the small towns that we would drive through along U.S. Route 1, the original Atlantic coastal highway, and made a list of all of the shops I hoped to see along our drive.


The first stop was Quilt 'n Fabric, owned by Ruth Davis, located at 11 Sealcove Road, Southwest Harbor, Me., 04679.  A little off the beaten path, this store carries yarn and needlepoint notions, as well as quilt fabric.  I picked up a pattern for an adult-sized stocking cap my sister wanted, as well as a piece of green 'blending' fabric for those Irish-themed quilts I make.  I also scored some soft baby yarn on sale, for my other sister.  This shop wasn't on my 'list', but I was happy we stumbled upon it.

Driving south from Bar Harbor toward Freeport, we passed through the town of Belfast.  The second shop was off the highway, in the downtown area.  


Fiddlehead Artisan Supply, located at 159 High Street, Belfast, Me., 04915, carried a bright array of quilting prints and panels.  The shop is very cute, and has a lot of sample projects on display.  In addition to quilt fabric, they also carry wool roving, beautiful papers for card and book making, some rubber stamping supplies, and paints, pastels and sketching supplies.  We saw an adorable 'ABC' panel for a baby quilt, and my daughter picked out the companion fabrics for the blanket.

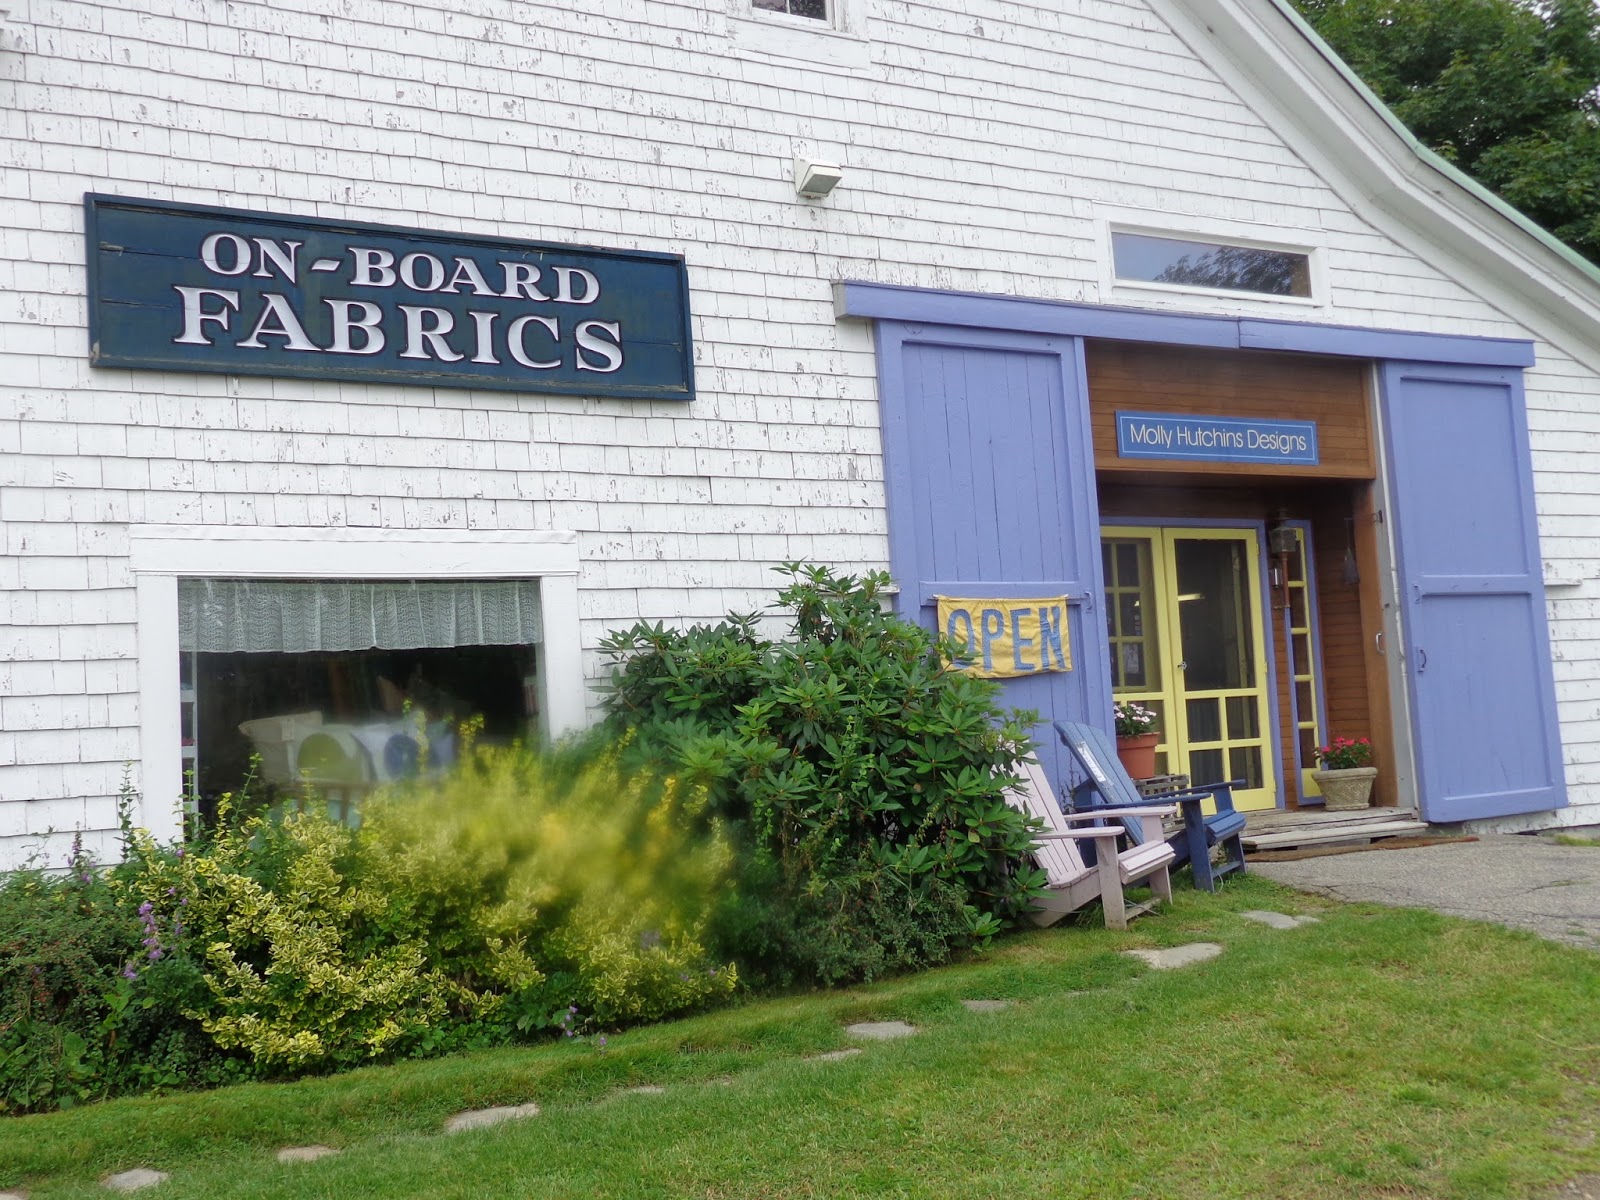
We stumbled upon the next shop on the way to Boothbay Harbor and our whale watching excursion.  On Board Fabrics (www.onboardfabrics.com) is on Route 27 (660 Boothbay Road, Edgecomb, Me., 04556).

It is a few minutes out of town in a old barn that doesn't look like much from the outside, but is really cool on the inside, with exposed beams and a rustic feel.  The shop has been there since the 1990's, but current owner Molly Hutchins purchased it about two years ago.  She has her own line of decorative pillows for sale, and carries home-dec fabrics alongside the quilting cottons and batiks.  I picked up a hand-screened panel of a starfish that will make a cute pillow for my friend who owns a beach house, as well as some Maine-inspired kiddie prints for another baby quilt.

My daughter needed coffee so we stopped in the small town of Brunswick.  It has an old-fashioned downtown feel, and I found a small shop called The Fabric Den at 124 Maine Street, in the lower level of the Senter's Place building.  While the fabric selection was a bit limited, the owner has a busy schedule of classes and project days for her clients.  She also recently purchased a long-arm quilting machine, and is gearing up to teach others how to operate it and will offer machine-quilting services.  After losing her husband a couple of years ago, this is a new venture for her and she hopes to expand and move in the coming year.

Freeport, Maine, is home to L.L.Bean, and they have a huge flagship store (and an outlet across the street, too).  It's worth a stop and is open 24 hours a day.  A couple miles south of L.L.Bean on Route 1 in a small strip mall was by far my favorite shop on this trip.


 Cottonweeds  (www.cottonweeds.com) is a full-service shop.  It has books, patterns, 100% cotton quilt fabrics, batiks, hand-dyed 100% wool fabrics, sewing machines and offers a wide variety of classes.  There are many completed quilts and projects on display throughout the store, and the fabric selection is vast.  It has a sensible layout and lots of  'eye candy.'  I could have spent hours in this store, and maybe someday I can go back and take a class with them.  But, alas, we were moving on, heading toward Boston.

Our Friday morning destination was the Allagash Brewing Company in Portland, for a brewery tour and beer tasting (my daughter's idea, of course :).  Well worth the trip!  It was an informative tour, the free samples were generous, and I especially liked that they recycle or re-purpose things.
I love this chandelier made from recycled beer bottles...may have to go on my project list!
Not far from the brewery was the last stop on my quilt shop quest -- Sew Portland, 306 Warren Avenue, Portland, Me. 04103.  This unassuming storefront has a large display area and carried plenty of ocean and beach inspired fabrics.  Patterns for all sorts of quilting projects, both big and small, are available here.

I kept seeing lobster print fabric, but just couldn't think of anything to do with it!!
They are also a Pfaff sewing machine dealer and have a classroom for in-store lessons.  Owner Kathy Stanley has another shop in central Maine (Sewing by the Sea, 11 Periwinkle Lane, Trenton, Me), that I didn't get to, but if the selection of fabric available in Portland is any indication, I think it will be a 'must visit' on my next trip.  

There were many other shops on my list, but eight days just wasn't enough time!  I wished I had stopped in Nobleboro for Attic Heirlooms, Alewives Fabrics and Mainely Sewing.  Fabricate, a little shop in Bar Harbor, is closed on Monday, the only day we were in town, so I missed that one.  Knight's Quilt Shop in Cape Neddick will have to wait until next trip, along with the Mariner's Compass in Bath.  There are about 44 quilt shops in Maine, and I only scratched the surface, but I have a lot of new projects to keep me busy through the fall and winter, and something to look forward to the next time I road trip to the North!


One more thing I think any sewer would appreciate...while in Boston, we walked down Newbury Street, considered the 'fashion district' of Beantown.  In the front window of AllSaints Spitalfields, a European fashion house for men and women, there are over 300 antique sewing machines.  I stood there for 10 minutes admiring the display, wondering how they amassed the collection.  I only hope that when they change the window display, those machines find a loving home!


View of Newbury Street, from inside the store, showing just a bit of the display.

Friday, August 2, 2013

A twist on an old favorite: Cheese Steak Egg Rolls

Last month, my d.h. took me to a Phillies game for my birthday, and we arrived at Citizen's Bank Park early enough to get lunch at Harry the K's restaurant.  (Usually, the line for a table outdoors is very long, but we were seated right away.)

Because it was a hot day, we just ordered a salad to share and an appetizer -- Cheese Steak Egg Rolls.  They were served with caramelized onions and Chipolte mayonnaise. Delicious!

Since then, I've been thinking of trying my hand at making them at home, and today I finally tackled it!

The ingredients for a great dinner -- or snack!
The ingredients are simple:

1 pound of chip steak -- I purchase mine at the local butcher, but you can substitute Steak-Ums.  (For those not from the Philadelphia area, chip steak is top round beef, usually frozen and sliced very thin by a butcher.)
5 slices of cheese -- I used American, but Provolone would be good, too.
10 egg roll wrappers -- I found these in the fresh produce section of my grocery store.
olive oil for cooking the meat
vegetable oil for cooking the egg rolls

Optional:  I decided to make caramelized onions.  I had a Vidalia onion handy, and started them first.  Slice the onion into thin strips.  Add 2 tablespoons of olive oil and 2 tablespoons of margarine or butter to a heavy skillet.  Heat on medium high; add onions and begin to cook.  After the onions become transparent, lower the temperature to medium low, and let the onions cook for about 45 minutes, stirring and turning them every five minutes.
The onions are turning brown, but have about 15 more minutes of cooking time to bring out all of the sugar in them.
You want them to start to stick the pan a bit before turning them. Scrape the brown bits from the bottom of the pan every time you turn the onions.  If you need to, add a bit more olive oil to keep them from drying out. You'll know they are done when they are a deep, golden brown and very sweet tasting.

Cut the meat into thin strips.  Heat about 2 tablespoons of olive oil on a large skillet.  Add the meat and season with salt and pepper.  Cook over medium high heat and stir frequently.  Cook until evenly browned.  Remove from heat and drain the meat, pouring off any fat or drippings.  Set aside to cool.
Chip steak cooked and drained, waiting for the onions to finish cooking!
Cut each piece of cheese in half.  Prepare a work surface -- I put foil on the countertop, and had a tray nearby to hold the finished egg rolls.  Also, fill a small dish with water, for brushing on the egg roll wrapper.

Lay out the wrapper in front of you so it looks like a diamond.  Lay a half of slice of cheese on the wrapper. Top with about two or three tablespoons of cooked meat.  Mound on top one tablespoon of caramelized onions.


Ready to roll!


Fold the bottom point of the wrapper up and over the meat filling.  Use your fingertips to moisten the left side of the wrapper and fold it over to the center. Do the same with the right side of the wrapper, tucking the wrapper in to seal the sides.  Moisten the top point of the pastry and roll the bundle toward the point to seal.  Lay each egg roll on the platter, point side down, until you are ready to cook them.


Moistening the edges of the pastry help it stick together. 

I haven't used a deep-fat fryer in years (trying to eat healthier!), but I did get it out for this project.  I used four sticks of Crisco, which melted down to about three inches of oil in the fryer.  You could use a heavy pan (Dutch oven) and Canola oil if you don't have a deep-fat fryer.  Be very careful when heating oil!

Fry egg rolls in batches for two to three minutes, flipping at least once to brown all sides.  Remove from oil and drain on a plate covered with paper towels.


Keep an eye on the egg rolls -- the cook very fast!

Serve immediately while hot. Refrigerate left overs -- they can be reheated in the oven, set at 400 degrees, for 5 - 10 minutes.

Two were plenty for my dinner, but my son ate three!  I served mine with Chipotle mayo, but you could use ketchup or hot sauce or pizza sauce, if you want.  These could be a fun appetizer for a small crowd -- my Bunco Babes will be looking for them when I host Bunco this fall!!


Yum!  I added Chipotle Mayo and more onions on the side!