Sunday, April 13, 2014

Quick Zip Bag

Not so long ago, I was 'gifted' a HUGE bag of zippers -- over 300! -- and I've been looking for fun projects to make using some of them.

One of the customers at the shop where I work came in with a purse she bought in  Indonesia, and I was all over it.  It had a top zipper, plus two more zipper pockets on the front, and a long strap so it could be worn over the shoulder or across the chest.  She let me examine it closely so I could see the construction techniques used, particularly how the zippers were applied.  I couldn't wait to rush home and create one for myself.  So here it is!


Now for the step by step instructions:  I used double-sided, pre-quilted fabric so the purse would have some body and did not require lining, but you could make your own quilted fabric with something in your stash, or use a heavier fabric (maybe upholstery weight?) and line it.

Of quilted fabric, cut two  pieces 8 1/2" by 11 1/2" for the front and back, cut one piece 8 1/2" x 4" for pocket A, cut one piece 8 1/2" x 7 1/2" for pocket B.

You will need: thread, 60" of 1" wide nylon or cotton webbing to match your fabric, two 1" D rings, two 1" swivel clips, and 3 zippers to match your fabric, 8" or 9" long.

I used leftover scraps from another project for my zip bag.  I decided to use the 'reverse' side (red print)  for pocket B
Clean finish the raw edges of the bag and pocket pieces.  I used the serger to do this.  

This bag calls for an unusual zipper application that I call the "Inside Out" zipper application.  The first side of the zipper tape is stitched to the top of each pocket with topstitching, but the second side of the zipper tape is stitched right sides together to underlying pocket.  When you flip the pocket into it's finished position, the zipper tape is hidden. 
  
Apply Pocket A to Pocket B using this technique.  Fold under one long edge of Pocket A 1/4" and press well. With the zipper tape right side up, pin the wrong side of the pocket to the zipper tape, being sure that the zipper pull is 1/2" in from the edge of the pocket.  (If you are using a longer zipper, it's o.k. for it to hang off the other side of the pocket, as long as the pull is 1/2" in from one side.  Or you can shorten it to 7 1/2" by using a close zig-zag stitch across the zipper and snipping off the excess.)    Using the zipper foot on the sewing machine, topstitch the pocket to the zipper tape.
  

Draw a placement line on Pocket B, 3 1/4" from the bottom of the pocket.  Lay Pocket A, right sides together, on top of Pocket B, lining up the free edge of the zipper tape on the placement line. In this photo, Pocket A is to the left (the top of Pocket B).  Using the zipper foot, stitch the free edge of the zipper (with the wrong side of the zipper tape up) to Pocket B.
  
Pocket A is laying RST over the top of Pocket B when stitching down the second part of the zipper tape.   
Now flip Pocket A down over the bottom of Pocket B.  Machine baste along the bottom edges to hold Pocket A to the bottom of Pocket B.

Apply the zipper to Pocket B in the same manner:  fold and press under 1/4" on the top of the pocket, pin the pocket to the right side of the zipper tape, being sure the zipper pull is at least 1/2" from the edge of the pocket, and topstitch.  NOTE:  Make sure the zippers on both pockets will open in the same direction.  Draw a placement line 7 1/4" from the bottom of the purse front.  With right sides together, lay the pocket to the bag front, pin the free zipper tape along the placement line, and stitch in place on the wrong side of the zipper tape.

When pinning the pocket to the bag front, the pocket is laying over the top of the bag, and the wrong side of the zipper tape is showing.  
After stitching down the zipper, flip the pocket over, so the wrong side of the pocket is against the right side of the bag front.  Pin the bottom edge of the pocket to the bottom of the purse front.  (Trim off any excess fabric, so the edges are even).  Baste along the sides and bottom of the pocket.

Apply the zipper to the top of the bag front and back.  Clean finish the top edges, fold under 3/8" and press.
Lay the zipper right side up, and place the bag front and back on top of the zipper tape, wrong side down, the right sides of bag facing up.  Align the edges of the bag so they are even, and carefully pin the bag fronts to the zipper tape, making sure the zipper tab is at least 1/2" from the side of the bag.  (A glue stick on the zipper tape or a skinny fusible like Steam a Seam would come in handy here, but a lot of pins will do the job as well.)  Top stitch the zipper to the bag front and back using the zipper foot on your machine.

The zipper is pinned in place, ready for top stitching.  Note that the zipper pulls are 1/2" from the side edge of the bag are facing the same direction.  All of the zippers will open left to right when the bag is finished.  
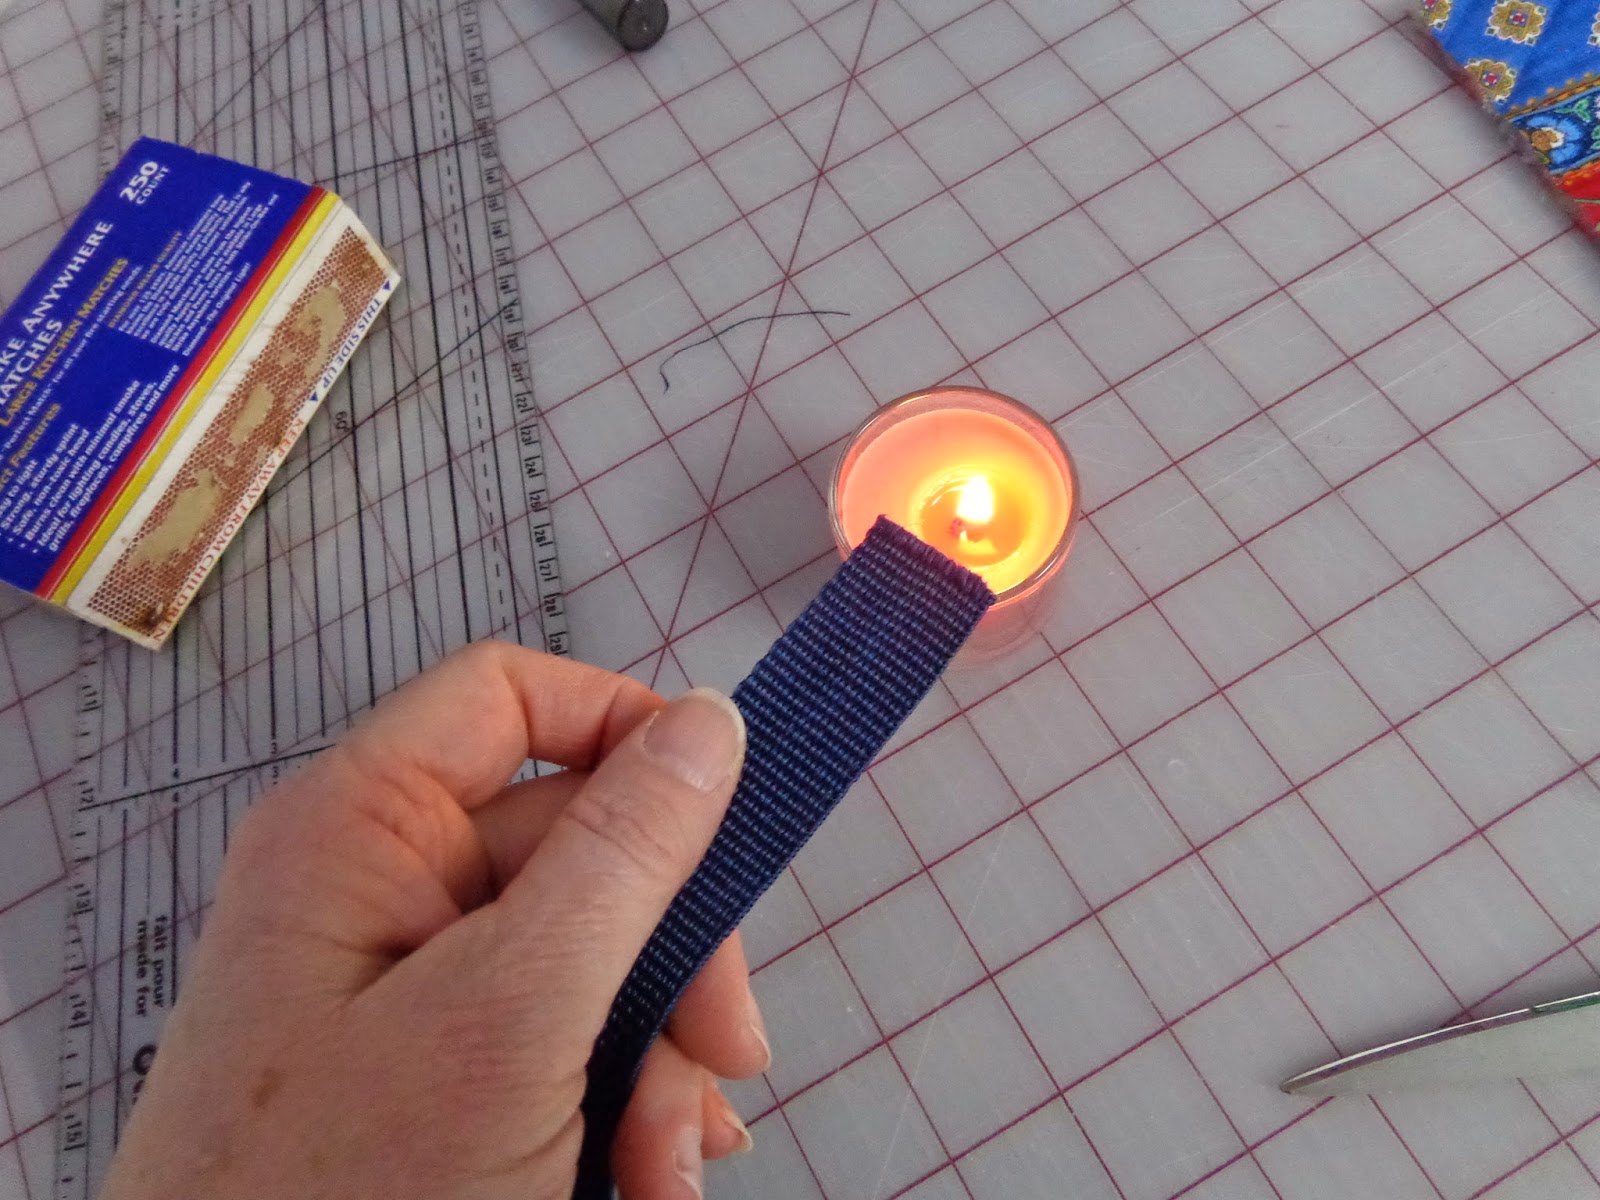
Before you sew the bag together, you need to create the hanging strap on the back of the bag.  If you are using nylon webbing, cut two pieces 2" long.  I use a candle to melt the ends of the webbing so they don't fray.  Carefully hold the webbing about an inch away from the flame for about 10 seconds.  Don't touch the webbing until it cools -- it will burn you when it is hot!  Do this for all cut edges of nylon webbing.  You can use Fray Check on cotton webbing to keep it from fraying.


Draw a placement line 1 1/2" below the zipper on the purse back.  Fold the 2" tab of webbing in half and slip a D ring into the fold.  Pin the tab just below the placement line, one inch from each side edge.  Baste in place.
  

Cut one 8 1/2" piece of webbing and pin along the placement line.  Top stitch a scant 1/4" from both edges of the 8 1/2" strip to secure the D ring tabs in place.


Now you are ready to sew the sides of the bag together.  VERY IMPORTANT:  un-zip the top zipper half way before you pin and sew the sides of the bag, otherwise you'll have difficulty turning it right side out.  Pin the purse front to the back, right sides together, aligning the bottom edges and side seams.  Use a 3/8" seam allowance.  If you used 9" zippers, be careful when stitching over the ends.   After sewing the side seams, you can trim the zipper ends from inside the bag.  Turn bag right side out.

Create a strap using the remaining 1" webbing by stitching it to two swivel clasps.  

It's finished!  This is just the right size for an e-reader, a wallet, cellphone, and a few essentials.


Monday, March 31, 2014

Get Off the Interstate...Small Town America is Waiting for You!

I live on the East Coast, very near the 7th largest Metropolitan Statistical Area in the country. Yes, that's Philadelphia.  And while I've come to enjoy living there, I miss the open spaces and small towns of the Midwest.

I'll admit it -- I'm a Missouri girl.  What does that mean?  It means that I appreciate a freshly-plowed farm, the clack-clack-clack of a freight train rolling down the tracks, and the quirky small towns found on the back roads that don't have names or numbers, but letters to identify them.

Today I drove to one such small town on a quest to find my maternal great-great grandfather's grave.  Eli Reno was buried on his farm, just south of Chester, Illinois, a stone's throw from the Mississippi River.  It's about two hours south of St. Louis.  Some distant relative that I still haven't been able to place in the family tree found his grave site, as well as those of a daughter, son-in-law and grandson, back in the 1970's.  She gave me a few clues to follow in a letter sent to my mother back then.  About four years ago, a Randolph County, Illinois, historian helped me locate the farm my great-great grandfather owned.  She had been to the burial place and found the other headstones, but didn't find Eli's.  She surmised that it had fallen over and become buried in soil or under the native grasses.  She suggested that I return in the winter or early spring, before the fields were planted and the grasses started to grow, and that I bring along some tools to find it.

I packed my car with a hoe, gloves, a cold drink, my notebook and a camera.  I headed down the interstate, but soon got off on Highway 61, then onto Highway H toward Perry County, Missouri.  I drove over the two-lane Chester bridge on Highway 51 into town and stopped at the Visitor's Center. I was greeted by this:

 
For those of you in your 50's, you'll recognize Popeye, a cartoon character that first appeared in 1929 in the "Thimble Theater" comic strip.  Popeye, the strong, hardworking sailorman, soon became the 'star' of the strip.

Popeye, and all of his cartoon friends, were created by Elzie Crisler Segar, born in Chester in 1894, just a year after my grandmother.  They probably went to the same one-room schoolhouse as children.  Elzie took a mail order cartoon course, then moved to Chicago before breaking into the comics.  It's said that he based some of his characters on people he knew from Chester.

The city has embraced his legacy, and is erecting statues of his beloved characters all over the town.
Olive Oyl, Swee' Pea and Eugene, near the Randolph County Courthouse
The Annual Popeye Picnic is held on the weekend following Labor Day every year (www.popeyepicnic.com).  The three-day event is filled with attractions and entertainment for all ages.  A new Popeye Character Trail statue has been unveiled annually since 2006.
Wimpy's statue is near the Popeye Museum.
This is why I love the back roads of our country -- you'll never know what interesting things you find in the small little towns where people settled 150 years ago. It's fun to drive through downtown areas and see how life used to be.  It's interesting to visit local historical homes or museums, or talk to the people who to genealogical research, who are familiar with your family surname and can tell you stories about the town and its people.

Back to my quest.  I found the Reno homestead, which is still being farmed some 150 years later. However, the tree stump that was my landmark in the field was gone.  And after trudging around in the field for nearly two hours, I concluded that the headstones were also missing.  This is unusual, because most farmers are respectful of family burial plots and will plow around them.  I have the telephone number of the owner of the property -- his neighbor was kind enough to call him and ask for permission for me to hike around, and the owner thought the gravestones were still in the field. I'm hoping to talk to him soon and see if he can find them or at least talk to the man who is farming the land and see what happened to them.  At first, I was a little distressed, but then realized that the Catholic tradition of placing ashes on the forehead at the beginning of Lent has some relevance here:  remember man that you are dust, and unto dust you shall return.

And, after further reflection, my ancestry quest won't end because I couldn't locate a headstone.  The bigger question that has still gone unanswered is who were Eli Reno's parents?  It may be one that I never answer.

And while I'm a Missouri girl, my maternal ancestors were from Illinois (by way of Ireland), and now I have a real connection with this little town off the beaten path.  (And I'll have spinach salad in tribute to its native son!)

Monday, March 3, 2014

From Old Sweater to Trendy Handbag

I'm jumping onto the bandwagon of recycling old wool sweaters into felt, and here is my first project:

Felted wool purse, with a leather strap and floral print lining.
My friend Sherrie hooked me up with the Salvation Army store about five miles from my house, where every Wednesday is "Half-Price Day."  So the $3.99 sweaters I found there cost me just two bucks each!  (It's also been a gold mine of leather that I'm recycling into other things...and just wait until you see my latest t-shirt quilt project, made from 50 cent tees!)

The key to felting sweaters is to be absolutely sure they are 100 percent wool -- no nylon, no acrylic, no rabbit fur, no cotton -- just 100 percent wool.  Garments are required to be labeled with the content of the fabric, but if you happen to come across one that isn't labeled, leave it on the rack.  It isn't worth your time or money.  Brands like LLBean, Land's End and Woolrich make wool sweaters, but always check the label. Crew necks and cardigan sweaters will yield the most felted wool...don't forget to look in the men's department for larger sizes!

Some sweaters will felt quicker than others but overall, it's an easy process.  Set your top-loading* washing machine to the hottest water temperature and add about 1/4 cup of inexpensive shampoo or laundry soap like Ivory Snow (but not detergent).  Use a long wash cycle; when finished, throw the sweater into the dryer on high heat until it is just damp.  Check and see if it is sufficiently felted -- shrunken to about half its original size and the fabric is about 1/4" thick.  If not, repeat the wash and dry cycle one (or two) more times.  Remove it from the dryer while it is still damp, pat it flat, and allow it to finish air drying.  (*I tried this in my front-loading washer, it is didn't do well, so I made a run to the local laundromat.  The agitator is the key to felting.)

When the sweater is completely dry, cut it apart along the seams.  Then it's ready to turn into something fun!
The sleeves, cut apart along the seam lines.
This handbag pattern was in Sewing Basket Fun, edited by Barbara Weiland (House of White Birches, 2005).  Designer Lucy Gray made the pattern 12" by 7.5", but I enlarged it a bit to 14" by 8.5".  I cut a rectangle that size from pattern material and rounded the four corners for the purse back/flap piece.  I needed a gusset strip 3" wide by 21" long, but had to piece it because I didn't have a long enough piece of fabric.  After cutting those pieces, I folded the back/flap pattern in half to cut a purse front (7" by 8.5").
The purse pieces, cut from felt:  one back/flap, one front and two 3" strips to make a 21" long gusset.
From a half-yard of coordinating floral print fabric, I cut out all three pieces for the lining.  With the remaining fabric, I cut three 2" wide bias strips.  I sewed them together to create one long piece, then pressed it in half and machine-stitched a single row of gathering stitches along the length.

Pressing the bias trim in half, wrong sides together.
I gathered the bias strip and pinned it into place on the inside of the flap, with about 1/2" of fabric peeking out to the right side.  I basted it in place, being careful that my stitching didn't show through on the right side of the felt.

The ruffle, pinned in place along the inside of the flap.
With wrong sides together, using a 3/8" seam allowance, I stitched the gusset to the back and front of the purse.  Because I'm using felt, I don't have to worry about the cut sides fraying, and thought having the seam allowance exposed looked cute.

Sewing 'wrong sides together' leaves the seam allowances on the outside of the purse.
I decided to add a piece of plastic canvas to the gusset inside, so the bag wouldn't be floppy and could stand on its own.  I cut it 2" wide and 20" long.

With the plastic canvas inserted into the bag, it can stand by itself.
I sewed together the lining pieces using 1/2" seam allowances, and slipped the lining inside the purse, wrong sides together, to check the fit.  I removed the lining and pressed under the raw edges all around about 1/4", so it would lie a scant 1/4" below the edges of the purse.

I slipped the lining back into the bag and pinned it all around the purse edges, then top-stitched it into place, leaving a 2" opening on the flap and around the purse top.  (Note:  the book instructions called for the lining to be hand-sewn into the purse, but I really wanted it to be secure, so I decided to top-stitch it.  If I make another, I may hand-sew it.)

I cut plastic to back the snap closures.
Now it was time to insert a magnetic snap.  After marking the center point of the flap, I marked where to cut two tiny slits in the fabric, and then slipped the 'male' part of the snap into place.  I backed it with the accompanying ring, then added a 1" x 2" piece of thin plastic, to reinforce the snap.  After bending the prongs down, I glued a piece of batting over the whole set-up.  I repeated the procedure for the 'female' side of the snap, then whip-stitched the opening in the lining closed.

Place the 'male' snap on the flap, then mark the spot for the female snap.


The directions suggest using a recycled strap taken from an old purse, but I had some dusty blue suede from a jacket I had recycled, and decided to make my own strap.  It needed to be about 30 inches long, so I sewed a few pieces together to give me the correct length, then sewed two straps, right sides together, along each side.  The strap was attached to the purse with 'D' rings.


The 1 inch wide strips of blue suede were sewn together to create a strap for the purse.  
I really loved this sweater, which was from Land's End, because even though it was made of wool, it had bright, spring-like colors in it.  The floral print, which I found at JoAnn Fabrics, coordinated perfectly.  I'm really happy with the way it turned out.  However, if you are a beginner, I'd skip the ruffle trim...it made a seemingly simple project much harder.

Happy sewing!!

Saturday, March 1, 2014

Cute Baby Quilts Don't Have to Be Hard

My nieces are having babies so fast, it's hard to keep up with them!

Case in point...three were pregnant at the same time -- one due in December, one in March and the third in May!

My custom is to make a baby quilt for each new great-niece or -nephew, but as my niece Gina's shower got closer, I hadn't yet started a blanket for her baby!  But I had everything I needed...my daughter helped me pick out the fabrics on our trip to Maine last summer.

We stopped in Belfast to pop in on Fiddlehead Artisan Supply, located at 159 High Street.  What a cute shop -- bright and colorful, with lots of projects on display!


In the window, we saw a cute panel by Robert Kaufman fabrics called "Bright and Buzzy."  It was designed by Laurie Wisbrun (screen print D #13774 www.robertkaufman.com).   Kaitlin thought is would be perfect for Gina's baby -- she's a doctor and her husband is a teacher.  My daughter picked out a bright yellow print for the back and a small green print for the binding...her first foray into selecting coordinating fabrics for a quilt.  She did a great job!

Panels are pretty easy to work with, but I try to put my own little twist on them.  After layering the panel over it's backing and batting, I decided to stitch around the printed 'blocks.'  Using a water-soluable blue marking pen, I drew stitching lines between the alphabet prints.

I added curves to my stitching lines to mimic the shape of the pre-printed 'blocks.'
Generally, it is suggested that quilting stitches be within 6-8 inches of each other, to hold the batting in place during use and laundering.  The overall stitching in some areas of the quilt was much bigger than that, so I decided to add detailing within some of the blocks.  For instance, I drew an outline around the apple, then stitched it with my sewing machine.

Safety pins hold the 'quilt sandwich' together while I do the stitching.

I did this for about eight letters.  To finish up, I added a narrow binding using the green print, and stitched it down by hand.

Everyone at the shower said the blanket was very cute, but I think my great-nephew is cuter!!

Photo: Thank you for the beautiful blanket Aunt Renee!! We love it!
Griffin gets some floor time on his quilt.


Thursday, February 20, 2014

Peyote Project

Peyote stitch is an old, off-loom bead weaving technique that takes a little time to get, but generates amazing results.  Beaders much more experienced in peyote stitch than I use it for complex jewelry and covering sculpture to create one of a kind pieces of art.

I saw a simple project in the June/July '13 Beadwork magazine designed by Pamela Kearns that I decided to try.  It incorporates a small piece of odd-count flat peyote stitch work, plus licorice leather, a relatively new product to the beading and jewelry market.

After a few fits and starts, here's the finished piece:


While the instructions in the magazine call for two smaller peyote pieces, I decided I wanted to go wider. I found a great website that helped me design my own zigzag pattern. While I wouldn't consider myself an expert in peyote stitch, here's how I made my bracelet.

I used two colors of size 11 seed beads, a size 10 beading needle and about 2 yards of Crystal Fireline, size D, a nylon braided beading thread that is ideal for bead stitching.
 
After a trial run, I determined that I needed 32 rows of stitching to fit snugly around the licorice leather.

I put a stopper bead on my Fireline (threading it on, moving it to within 6 inches of the end of the cord, and putting the needle back through the bead to create a 'slip' knot.)

To make a bead stopper, pass the needle through the bead in the same direction twice, then pull up the slack.  Leave about 6 inches of thread to weave into your work when you are finished.

To being peyote stitch, you thread on the first two rows of beads.

In this case, string on: 2 red, 5 yellow, 3 red, 5 yellow 2 red.  You have one string of 17 beads, with the needle on the right.

These 17 beads will make up rows 1 and 2 of odd count peyote stitch.
For Row 3, now working from right to left:  string on 1 red, skip the last bead in the previous row (in the diagram it's the last red bead numbered 1 on the right), and pass the needle through the next bead (in this case, the first red bead on the right in Row 2). Pick up 1 red, skip the next bead, and pass through the next bead (in this case, the first yellow bead from the right in Row 2). Continue on, picking up and skipping a bead, and passing through the next bead, following this pattern:
1 yellow, 3 red, 1 yellow, 2 red to complete Row 3.

Work row three from right to left.
At the end of Row 3, pull the beads snug, and tie a square knot with your working thread and the tail; pass the needle back through the last bead, now heading from left to right.  Your work may look a little wonky at this point, but don't worry...as you add Rows 4 and 5, it will begin to straighten out.  
Half-way through adding row three, you can see that every other bead starts to 'pop up'.  
Row 4 is 9 red.  Every other bead in Row 3 should be sitting a little higher than the bead in Row 2.  As you add each bead in Row 4, pass the needle through the bead that is popped up from Row 3, so they nestle together.

Add row 4 beads from left to right.
For Row 5, working right to left: pick up 1 yellow, pass through the last red on Row 4, then add 3 red, 1 yellow, 3 red, and 1 yellow to finish the row, passing the needle through every bead in Row 4.

At the end of Row 5, you can do a 'figure eight turnaround' by passing the needle back through the red 4, red 3 and yellow 2 on the diagonal, then pass through the red 2, up to the red 3 on the diagonal, and from the outside, pass the needle back through the last 5, so you're in position to continue with Row 6.

To turn around at the end of each odd row, pass the needle diagonally through three beads below the last bead, then work the needle back to the outside edge of the last bead in the row.  Pass through the last bead so your needle is in position to do the next even row.  The thread path will make a figure 8.  
Do this figure 8 turnaround at the end of the odd rows.  The pattern for the rest of the zigzag is as follows:

Row 6:  1 yellow, 2 red, 2 yellow, 2 red, 1 yellow
Row 7:  2 yellow, 1 red, 3 yellow, 1 red, 2 yellow
Row 8:  9 yellow
Row 9:  1 red, 3 yellow, 1 red, 3 yellow, 1 red
Row 10:  1 red, 2 yellow, 2 red, 2 yellow, 1 red
Row 11:  2 red, 1 yellow, 3 red, 1 yellow, 2 red
Row 12:  9 red

The pattern for Row 13 is the same as Row 5, and so on.  Repeat the patterns for Row 5 through Row 12 to continue the design, until you get the length you desire.

To fit around my piece of licorice leather, I needed 32 rows...my last row was 9 yellow.  At that point, I folded my work in half, and 'zippered' the two ends together by stitching them back and forth to create a tube.  Once the tube of peyote stitching was closed, I buried my thread tails by working the needle through several beads.  I used a Thread Zap II by singe the end of the threads, instead of tying a bulky knot.

You may want to check the length of your work against your leather as you go...remember that you want the peyote tube to fit snugly on the leather.  You may need to add or subtract rows to fit your leather.

I finished my bracelet by adding two Regaliz Slice Spacer beads and a Regaliz magnetic clasp designed for the licorice leather.  I used a bit of super glue to hold the spacer beads into place and the attach the clasp to the leather.

If you can't find licorice leather, or just really like the zigzag pattern, you can make your piece of flat peyote long enough for a bracelet.  You probably will need to add more thread...just start weaving a new piece through the middle of your work until you get the needle into the position to continue stitching.  I rarely tie knots in bead work, I just weave in a new piece of thread and continue on.  The best clasp for this type of bracelet is the sliding bar clasp.

Gold Plated Slide Bar Clasp - 4 Strand

A really great source for Regaliz findings and licorice leather is Goody Beads (www.goodybeads.com). Their prices were among the best I could find.  They also carry the Thread Zap II.  

I'm so happy with the end result, it was worth all of the missteps to get there.  I'm not sure I'll make another...the materials ran about $25, but I think it's worth at least double that!  


Wednesday, February 19, 2014

The Wedding Season is Fast Approaching

Yes, even with all of the snow, the wedding season is fast approaching.  For 2014 alone, we've received five 'save the date' cards.  And my oldest nephew proposed to his girlfriend just a week ago, but I think that wedding won't be until 2015.  Whew!

So, I've been invited to a bridal shower in mid-March, with a 'high tea' theme.  I wanted to create a card with a Victorian feel, and found the perfect image among my Valentine's stamps.

The two cherubs with the heart is an older stamp by Personal Stamp Exchange (PSX).  But I think what makes this card beautiful is the coloring, and I wanted to explain how this was done.

Prismacolor pencils are among my favorites coloring tools.  I started with a basic kit of 24 pencils, then added about a dozen more colors to allow for depth and shading.


For instance, the cherubs are colored with two pencils, Light Peach (PC927) and Peach (PC939). But I want you to focus on the small rose, below.  I started with Orange (PC918) in the center.


Then I added Poppy Red (PC922) to the petals closest to the center.


The outer petals are colored with Crimson Red (PC924).


Although I use a small, circular motion to color in the design, you can see the pencil lines.  To smooth this away, blend and brighten the colors, I use a product called Gamsol and paper stubs. Gamsol is odorless mineral spirits.  It drys quickly and doesn't mar the cardstock.  It blends the waxy color of the pencils and blurs the lines.  Gamsol generally is available at art supply stores, but the little bottle, below, is packaged by Inky Antics (www.inkyantics.com).  Paper stubs are also available from their website or at art supply stores.

Can you see the difference between the roses before and after using Gamsol to blend the colors? It softens the pencil edges, but makes the colors brighter at the same time.


I finished coloring the entire image and added a little sparkle to the cherubs' wings with a Gelly Roll clear star pen.  Onto a pink 5" x 7" card, I mounted a piece of fuchsia paper, then cut an oval from a pattern paper.  I mounted the image behind the oval frame and adhered it to the card.  Vellum was the perfect paper for the 'Love' stamp, so the design could be seen through it.  I added a self-adhesive metallic heart to the greeting for a bit of dimension.

The couple lives in California, but the shower is in Pennsylvania, so it was recommended that we give gift cards for their registry stores instead of a package that will have to be shipped.

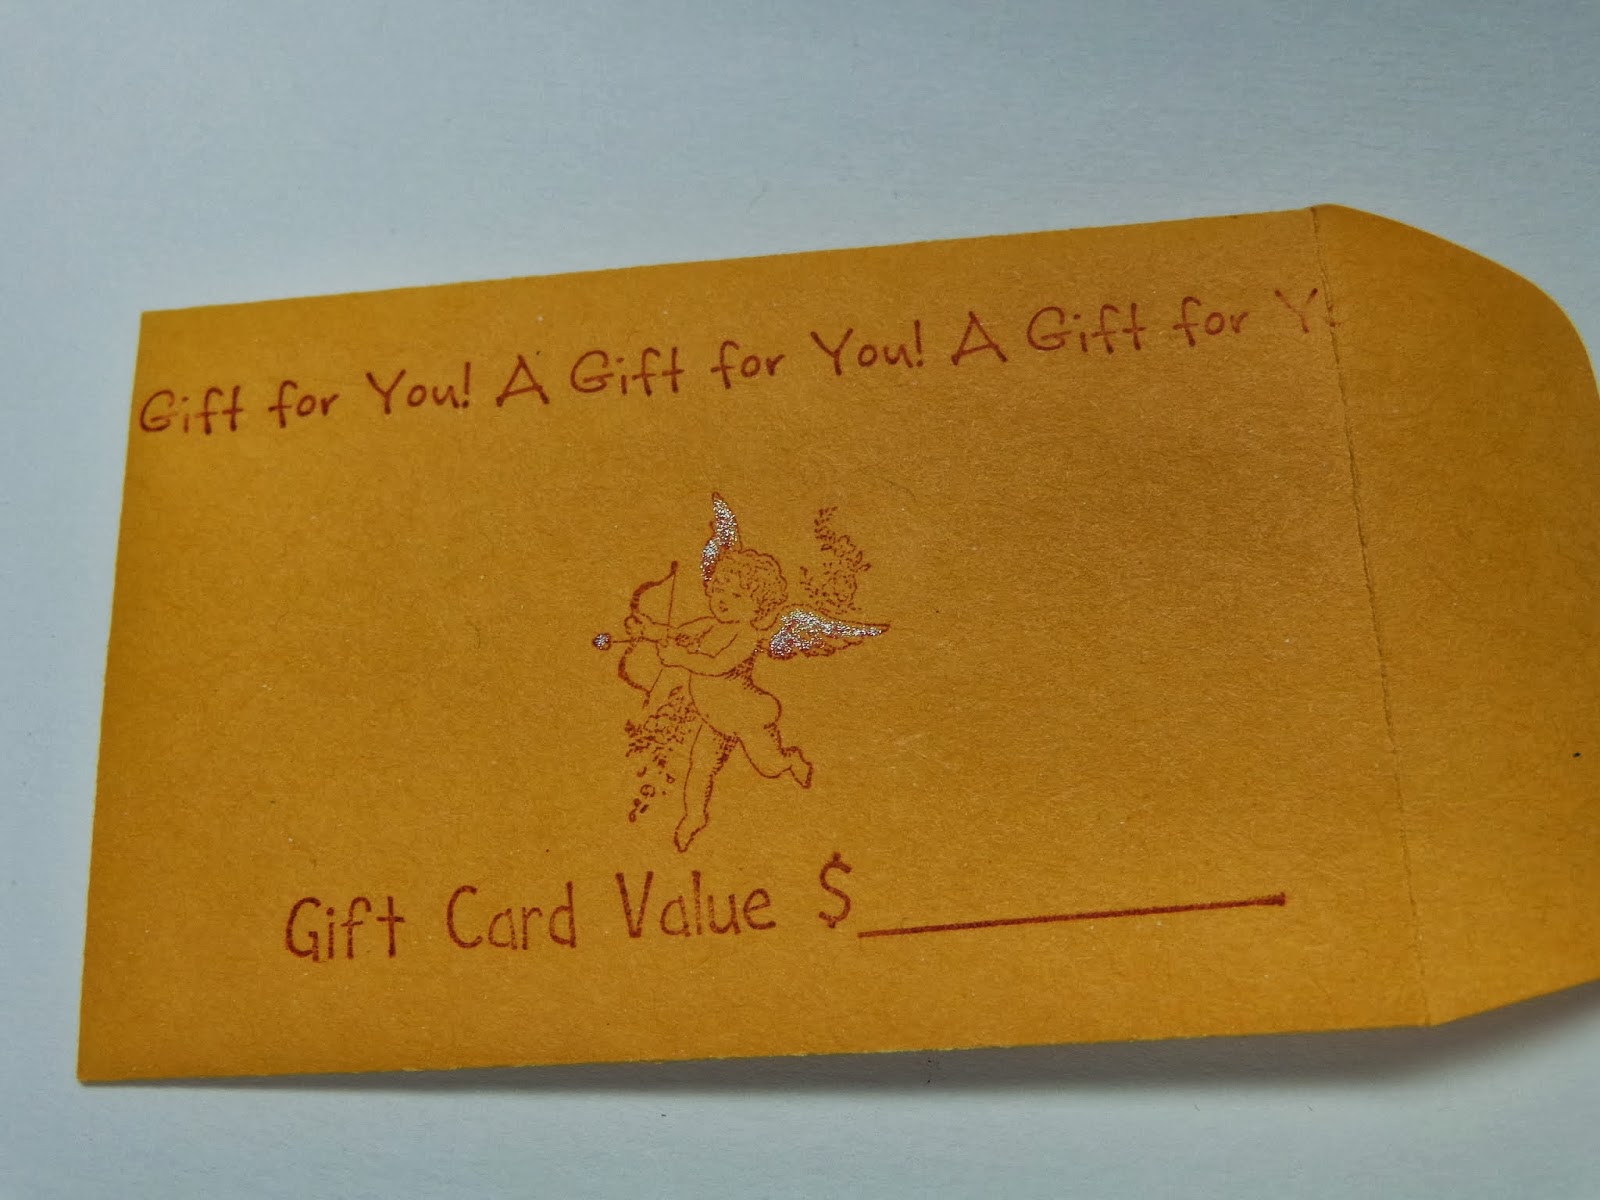
At the last rubber stamp show I went to, Endless Creations (www.shopec.com) had a set of 'gift card' stamps.  These little coin envelopes were in my stash, and they are the perfect size for a gift card (2 1/4" x 3 1/2").  I used Stampin' Up Baroque Burgundy ink and a little cherub to customize the envelope.  I'll enclose it in my card for the shower.  


Now I need to set aside some time to make the wedding cards for the upcoming nuptials!
At least I'm think about spring!

Monday, February 17, 2014

Valentine Greetings

Well, Christmas came and went before I had an opportunity to address and sign holiday greetings for our friends and family, so I decided to make up some Valentines to send out instead.

I had about 50 cards to make, so they needed to be quick and easy.  I haven't done any rubber stamping in a while, so it was fun to pull out all of my supplies.

First, the paper, including printed Valentine's paper I bought last month, vellum, and mulberry paper, which looks great behind a mounted image.

Inks are next...and I didn't just stick to pinks and reds.  Violet plays a role in Valentine cardmaking, too. And of course, a good black ink (Archival Jet Black by Ranger) and Versamark for embossing.

I have a box of stamped images that are left over from other projects and I searched through those for any images I could use.  And I dug through my boxes of embellishments to add some dimension to the cards, and I found a couple of stencils (lifted from store-bought cards) that I could use.


Can't do much without scissors and adhesives!
In addition to straight and decorative scissors, most of my cutting is done with a paper cutter.  The water-filled paint brush is great for coloring in designs using ink from the pads -- an added bonus is that is matches perfectly!  Judi-Kins duster brushes and a round sponge also come in handy for adding color to an image or the edges of cardstock.


My favorite adhesives are Tombow tape runner, Scrapbook Adhesives' vellum E-Z Runner and foam tape.

A long time ago, I needed an easy, space saving way to store my rubber stamps, and my local pizza place came through for me.  They gave me several new, clean boxes, which allowed me to sort the stamps by type -- specific holidays, background, greetings, etc.  It sure makes things easy to pull just one box of stamps out to work on my cards!
All of my Hearts and Valentines stamps in one box -- easy-peasy!

I made several of this first card, using a series of 'conversation' hearts stamps. After stamping them in a row (both vertically and horizontally) on white cardstock, they looked a little flat.  So I used Inkssentials Glossy Accents, applied directly over the image, to add some shine and dimension to one heart in the row.  After drying for a couple of hours, I layered the panel with some scalloped die-cut paper onto a card.


The 'rule of thirds' takes a role in this card.


Dividing the card in thirds makes it visually appealing.  In this case, the patterned paper takes up two-thirds of the card and the greeting takes up the top third.  A few stick-on crystals and pearls add a little bling.

The heart background paper in this next card looked very much like a stamp I had.

I stamped and embossed the image with red embossing powder on white cardstock, then trimmed it carefully following the outline of the heart.  The greeting was stamped on vellum.

This next card used the same stamp, but I trimmed around the center heart.  I really wanted the Valentine's paper to take center stage.

I managed to create a few more designs, but they were in envelopes and sealed when I started taking pictures.  My goal was to get them in the mail on Tuesday, February 11, but then a big snowstorm hit! Hopefully, even if they are late, these little greetings will be a welcome break from the weather!