Wednesday, July 17, 2013

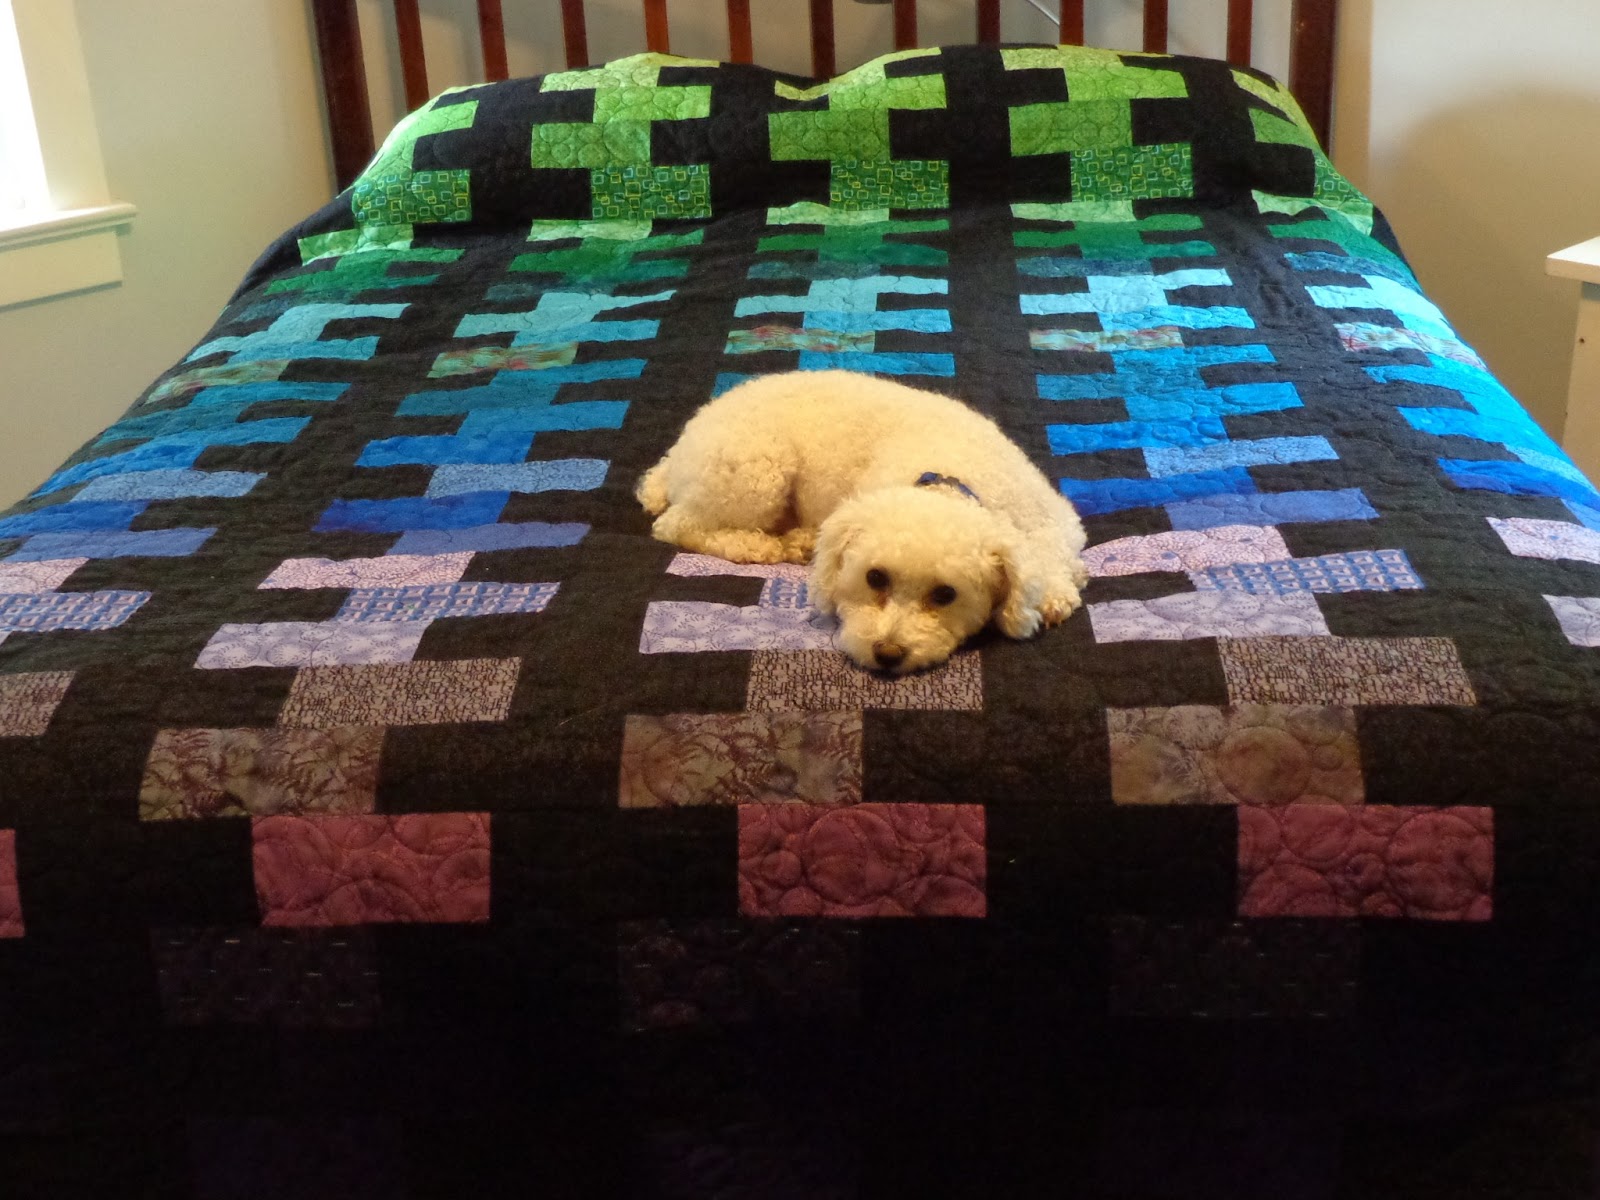
The Wedding Quilt

Lance on the Wedding Quilt
Novelist Jennifer Chiaverini has written a series commonly called the Elm Creek Quilt books, one of which was The Wedding Quilt.  It tells the story of how a family of women work together to create a beautiful quilt as a wedding gift for a young relative who is moving out West with her new husband, and how that quilt becomes a treasured possession that reminds her home. A generation later, the quilt is discovered at a museum, and the protagonist immediately recognizes it as the gift for her long-lost cousin.

When my son told us that he was planning to propose to his girlfriend, I began thinking about making them a Wedding Quilt -- something special that would represent the two of them.  My hope (as with all of the quilts I give as gifts) is that it will become a treasured part of their lives together.

I began by looking through my binder of quilting ideas -- mostly articles and photos that I've cut from magazines.  The inspiration for the quilt came from the unlikeliest of places:  a free project instruction sheet distributed by Wal-Mart.  "Quilter's Collectibles" flyers highlighted different fabric groups available for sale in the Wal-Mart sewing department.  In February 2007, "Bric-a-Brac" was the name of the quilt on a flyer that featured five colors of calico prints, plus black.

Rows of 'bricks' are not new to quilting.  I liked the general look of the design, but wanted to make it my own. The first thing I changed was the brick size.  The instructions called for 3" x 5 1/2" bricks; I cut mine 3 1/2" x 7".  The quilt instructions were for a full bed-sized quilt; this one needed to be a queen-sized quilt, so I lengthened each row.  The original pattern called for a border of bricks separated by 3" squares; I eliminated that element.  And finally, instead of using five colors of fabric (plus black), I decided that each row would be a different fabric.

My son is an engineer, and using 'bricks' on a quilt for him seemed like the thing to do.  My daughter-in-law, Mary, loves the colors teal and purple, so I decided to select fabrics on the cool side of the color wheel, starting with yellow-green and working through the spectrum to the deepest shade of violet. Once I had a general plan, the search for fabrics followed.

The first stop was my stash.  I had plenty of greens (see my post about the Irish quilt).  An American Sewing Guild (ASG) friend had passed away about a year before, and I had inherited several different quilting cottons from her.  I also put out the word to many sewing buddies and my sisters, hoping they would have some fabric in their stash I could use.  I had to purchase about 10 fabrics to complete the 'rainbow' effect.  Ultimately, the quilt ended up with 30 different fabrics, plus the tone-on-tone 'black.'  (I could have gone with a tone-on-tone beige or white, but decided black was more masculine).
   
I started by cutting strips 3 1/2" by the width of the fabric, then cutting the strips into 7" blocks.  I also needed a half-rectangle of black to begin or end each row.  Once cut, the rows went together quickly.
I used a quarter-inch presser foot on my machine to keep the seam allowances a uniform width.
Laying out the rows took a bit of time.  The transition between colors, say from green to teal to blue, created a bit of a challenge, and I moved some rows around until I was pleased with the overall look.  Then I began the task of sewing the rows together.

It helped to have a queen-sized bed to lay out the rows for the correct color placement.
With many quilt designs, there are seams that need to line up correctly for the block pattern to work out right.  With 'bricks,' however, the seams between rows don't meet at all -- they are off-set half-way.  I discovered early on that the quilt could get 'skewed' if I wasn't careful when sewing the rows together.  What it meant was that I needed to measure and pin every row to the preceding row to be sure that the 'bricks' would stack up correctly.

I measured and carefully pinned the rows in place before stitching, so the bricks would stack up!
I stitched together units of four or five rows,  pressing with the iron as I went, then attached one unit to the next unit. Not too long into the process I made a mistake.  I had attached four rows to the next set upside down, and the bricks and color progression was wrong.  I spent the next two hours ripping everything apart and sewing it together again, the correct way this time!

Sewing in units and adding one to the next kept the quilt from getting too unwieldy at the machine.  
The bulk of the quilt top assembly was finished at the two sewing camps I attended in the spring.  The day before I planned to take the top to the long-arm quilter, I discovered that I had not purchased enough fabric to back a queen-sized quilt, so I had to make another run to the fabric store.  I pieced the backing and cut the bias binding, then made the drop-off to the quilter.

Susie is the long-arm quilter that I have used for the past few years.  She is a great resource and really takes the time to help me select the best quilting pattern and thread color.  We decided to use a 'bubble' pattern of various sized circles, with black thread, for the overall quilt pattern.
I love how the quilting shows up on the lighter fabrics!
I liked the juxtaposition of the circles over the rectangles, and the black thread really popped.  Susie is very fast...I think she called me to pick up the finished project about five days after I dropped it off!

I use bias binding as often as possible to finish the edges of the quilts I make (see the blog entry about the Irish quilt for more details on bias binding).  My hope was to have the quilt finished and wrapped up before the wedding, but with other projects to complete (including my dress!), I didn't have time to sit and hand-stitch the binding down until the wedding was over.  Ryan and Mary's honeymoon gave me the all the time I needed to complete the project, and it was ready for them when they joined us for dinner the day after their return.

Oh, one more thing -- a quilt is not complete unless it is signed.  I purchased a new Bernina Artista 635 last year, which comes with an embroidery attachment, but I'm not very good at embroidery yet.  I was able to create a label to sew onto the back of the quilt, so it's signed and dated, like any valuable piece of artwork.  


Mary loved the colors in the quilt, and Ryan appreciates the time and care that went into making it.  (I was told the he was 'bragging' that I made my dress for his wedding!)  I hope that it turns into the treasured keepsake that I had in mind for the past year!


Thursday, July 4, 2013

The Dress -- Finally!

I was hoping to work on this post before the wedding and have it ready to go on June 30, but alas, having a house full of guests prevented me from doing anything other than cooking and entertaining!  After many mentions, here is the post about my 'mother-of-the-groom' dress.

Dressed and ready to go!
I have been sewing for over 30 years.  I took Clothing I and II in high school, and was lucky enough to have a mother who was an excellent sewist as a mentor.  When it came time to consider what I was going to wear to my son's wedding, my natural inclination was to make my own dress.  I have the skills...it was time to put them to use.

Simplicity 2247 and 1754 - both under consideration.
I had perused the pattern catalogs and found two that I thought could work. Both had princess seams -- the style that has a seam over the bust and down the side of the dress.  I knew from experience that this type of garment is easier to adjust for fit than a dress with a style with bust darts and no seam down the front.

While in Missouri in April, my sister's American Sewing Guild (ASG) neighborhood group was having a 'sew -in' and I decided to go.  My plan was to do a sample dress of each pattern in muslin and work on the fit.  When making a muslin, you learn about how the garment is constructed and you can add extra fabric to the seam allowance around each piece to allow for fitting.  One of the biggest frustrations for novice sewers is cutting out a garment and sewing it together, only to have it not fit right.  Creating a muslin is especially important to do if your finished garment is made with expensive fabric  -- making a muslin (using inexpensive fabric) prevents costly errors.

Denise and I work on adjusting a pattern.
It helps to have another experienced sewer in the room when you try on a muslin...she can help determine where you need to let it out or take it in for the best fit.  I got lucky because my sister's friend, Denise, was at the 'sew-in.'  She teaches Home Economics in the St. Louis School District, including clothing construction.  She was generous with her time and knowledge, and helped me understand how to alter a pattern to fit my body.  Most commercial patterns are designed for tall, slim women, and I am neither.  You can imagine that I had a lot of fitting work to do.

After cutting out two dresses and stitching them up, I tried them on, inside-out, for Denise to inspect.  She helped me isolate the problem areas and she showed me how to alter the paper pattern to allow for a better fit in those areas.  I went back to the sewing machine and made the alterations until the garment hung properly from my body -- no pulling across my stomach, no gaps in the bustline, and the seams on the sides hung straight.  After transferring the changes to the paper pattern, I knew that I could cut the dresses out of fashion fabric with the confidence that they would fit me well.

Upon returning to Philadelphia, I set the project aside for a few weeks.  Just before leaving for Sewing Camp with my ASG chapter, I was looking through my patterns for something else and discovered another dress pattern that I had purchased some time ago.  This too was a Simplicity pattern with princess seam lines.  I took it along, planning to make another muslin before deciding which dress to create for the wedding.   Again, having a room full of experienced sewers helped me adjust the fit for the third time, and I decided to go with Simplicity 0395 for my dress.
 

At this point, I had not yet shopped for fabric. I took one precious day of Camp (generally reserved for sewing) to go shopping, and ended up at Fabric Row in South Philadelphia.  I found what I was looking for at Maxie's Daughter.  The bridesmaids were wearing purple, and I selected a teal satin with matching teal lace, hoping that it would look good with the rest of the wedding party.  (What was I thinking??  I didn't have a single photo taken with the entire wedding party, but I did have one family picture, which included my daughter in the purple dress!!  Ha!)

Pre-washing fabric before cutting is something I was taught long ago, although it did give me a bit of a pause to wash the lace.  However, both fabrics laundered fine (with Ivory Snow -- regular detergent leaves marks on the satin), and I cut out the garment while I was still at Sewing Camp.

Each pattern piece was cut from satin and lace,
then stitched together
I spent a couple of hours stitching the lace to the under-dress fabric, planning to treat it as one fabric.  I folded it up neatly and brought it home with me to sew in the comfort of my own space, with all of my tools close at hand.

Having made the dress (in inexpensive fabric) ahead of time, it literally flew together.  I was nervous to try an invisible zipper, having never done one before.  It was so easy (with the proper presser foot on my Bernina) that I don't know if I'll every do a lapped or centered zipper again!
  
My first invisible zipper insertion!  Yea!


After the side seams were sewn, I tried it on for my daughter, and was happy to find that it needed to be taken in a bit.  Once I took care of that, all that was left were the sleeves to set in and the hem.  The sleeves did give me a bit of trouble...I ended up cutting them shorter, and in retrospect, I think that I made one adjustment too many on the armscye (the opening for your arm to go through).  If I ever want to wear it again, I may have to take the sleeves out and trim away a bit more fabric for wearing ease, then re-set the sleeves.  It didn't look bad, it just was a bit uncomfortable that day.


So, how long did it take?  Well, if you don't count the time invested in making and adjusting muslins (and the 30 years of experience!), the actual sewing took about 6 hours.  Yes, that's all -- 6 hours to complete a semi-formal dress.

There are three reasons to sew it yourself -- first, the fabric, pattern, zipper and thread cost me only about $50, a fraction of what I would have spent in a bridal salon.  Second, I could adjust the fit so it was comfortable on my body -- something you have to pay dearly for when purchasing ready-to-wear that needs alterations.  Third, no one else will ever have the same dress.  I had many compliments that day, and people came back to me a second time when they learned that I had made it myself, to tell me how impressed they were.  (I take that to mean it didn't look 'homemade', but 'custom made!)

My d.h. and me, after the ceremony -- one down, three to go!
I have more wedding preparation photos to post...check back later to see what else kept me busy in June!

Happy sewing!  

Monday, June 17, 2013

Christmas in June?

You've all heard of "Christmas in July," a time for sales at your favorite stores.  How about Christmas in June?

It's a little hard to think about the holidays when it's 80+ degrees outside, but I have a wedding shower to go to this weekend, and 'O Christmas Tree' is the theme for my gift.
Decorated and lighted Christmas tree ยป The Stock Solution

Last fall, I was outlet shopping with my Bunco gals, and one person wanted to stop into the Lenox factory store.  Ho, hum...I thought there would be nothing there for me, but I was surprised to find some beautiful china Christmas tree ornaments on clearance.

I picked out a dozen different designs for $2.00 each (regularly $6 to $8 a piece), and thought to myself, "These would make a nice wedding shower gift."
A sampling of the Lenox ornaments I found...
Funny thing...on the drive home, I received a text from my sister-in-law that her son, Kevin, had proposed to his girlfriend that afternoon!

Me (being me) thought that a nice addition to the tree ornaments would be a hand-crafted Christmas tree skirt.  I got the invitation to the shower about a month ago, and started looking for a pattern.

I found one I liked in the Better Homes and Gardens "Christmas From the Heart" book, volume 9 (copyright 2000).  Designed by Phyllis Dobbs, it's called "Star-Tips Tree Skirt."  While hers is a bit 'country' looking, I changed up the fabrics, which made mine a little more dressy.  I had to enlarge the pattern in the book, using one-inch grid fabric.

The pattern was printed smaller in the book, and needed to be enlarged on grid paper.
The project called for four different fabrics:  green, red, off-white and brown.  I had the red and green in my stash, but had to make a run to the fabric store for brown and off-white.  After finishing my pattern pieces, I began to cut the fabric.

The red and green fabrics have a hint of gold in them.


It is a simple enough pattern to follow...two small off-white triangles are stitched on either side of the tree trunk; a green triangle is bordered by two larger off-white triangles;  stitching those pieces together completes the 'block'.  The block it attached to a red piece, making a panel of the tree skirt.  There are 8 panels in all.
Three sections make up one panel.


The directions called for the entire thing to be bound by matching, self-made bias tape, but that would take me hours to do, so instead, I decided to layer the tree skirt and its backing fabric right-sides-together, layer on a piece of batting, and then stitch around the whole thing, leaving about a 6 inch opening to turn it right side out.


I did have to trim the corners well and clip the inner curve before turning it, but a good pressing with a steam iron was all it took to make it lie flat.  I stitched inside the trees and the around the circumference of the red fabric to quilt the layers in place.  A large plastic snap will secure it around the trunk of the Christmas tree.

Trimming the tree skirt after it is sew, right-sides-together.
Start to finish, it probably took about five hours, including the time to enlarge the pattern, cut everything out, and sew things up.  The ornaments and the tree skirt are all wrapped up and ready to go!  One more thing crossed off my 'to-do' list!


Saturday, June 15, 2013

A Wedding Photo Album with a Twist

When you hear "Wedding Photo Album," I bet you think about the traditional albums put together by the photographer with all of the 'posed' pictures.

This project is anything but that!

My son and his bride have booked a photo booth for their wedding reception...you know, the kind you find on the boardwalk or in shopping malls, in which you cram as many people as you can inside, and it takes four photos and spits them out on a strip.


Hollywood Photo Booth | San Francisco Bay Area Photo Booth
The traditional photo booth.

Photo booths are apparently a trend for wedding receptions.  The guests get to have a little fun (there is a box of 'props' they can use for their photos) and the bride and groom can pay a little extra to have two copies of the photo strip made -- one for the guests to take home, and one to adhere into a photo album set up right outside the booth.

My future daughter-in-law asked me to pre-decorate a photo album to use.  It does make sense...by pre-decorating the pages, we can somewhat control how the photo strips are put into the album. (We don't want just one per page -- we'd never fit them all into the album that way!)

My friend Sherrie sells Creative Memories products, and I was able to purchase a discontinued white embossed 12 x 12" album from her inventory, along with 2 packs of 15 pages and page protectors to go inside.  That gives me 60 pages (front and back) to decorate.


I'm not quite finished yet (I need to have space for at least 200 photo strips!), but I thought I would share some of the pre-decorated pages with you, in case you have to work on a similar project this summer!

This page is reserved for Ryan and Mary...their photo will go on the left side of the  'D'.
This is the first page as you open the book.  The purple glitter paper picks up the color scheme of the wedding.  I used a Puzzle Mates Puzzle Template Book to trace the outline of the letter D and added their wedding date using stickers.


This is one page of a two-page spread, titled "Down the Shore."  (It's a Philly thing to drop the 'at' in that phrase...I know better, but at some point, I gave up arguing with everyone about it!)  By laying out the 'beach towels,' I could fit 6 photo strips on these two pages.


Here is a close up of one page...the photo strips are 2" by 6", so I made the mat papers 2 1/2" by 6 1/2", and wrote on each one 'photo strip here' or simply 'photo.'  For dark papers, I wrote with a silver gel pen. I tried to leave space around each photo strip so the guest can write their names and/or a message for the couple.  On this page, the wavy 'banner' to the left of the mat is for people to sign their names.


This page is kind of fun...I used a template (unknown source) for the house, and drew the tree freehand.  I drew in journaling lines on the roof and in the tree so people would know where to leave a note!


This is a very simple layout, but I think the background paper and color scheme make it a classic.  I used the middle size of a Spellbinders "Labels Twenty" die set to cut out the red paper, and drew journaling lines on each.  The thin black borders were punch outs from a set of scrapbooking paper, but you could easily use decorative scissors on a thin strip of cardstock to create the same look.  

Still have a lot more 'pre-decorating' to do, but with 13 of the 60 pages finished, there is already room for 45 photo strips.  Mary took a look at it, and gave it rave reviews.

Can't wait to see it after the wedding, filled with the memories of the evening!


Thursday, June 13, 2013

A little D-I-Y gift for the bridesmaids...

A lot of people look to D-I-Y gifts as a way to save money and provide a personal touch...and in this case, I think we accomplished both! 

My future daughter-in-law, Mary, bought a cute stretch bracelet on Etsy a few months back, and then decided that she wanted to make similar ones for the members of her wedding party and a few close friends.    She visited The Bead Garden in Havertown, Pa., one afternoon (when I was not working), and spent an hour with the owner, Leslie, designing the bracelets and selecting the supplies we would need to finish the project. 
Violet crystals, pave crosses and Stretch Magic is all it take!
Of course, we had to order some supplies, and unfortunately, couldn't find a wholesale source for the crosses Mary wanted to use.  Luckily, I found them on Etsy and ordered what we needed. With everything delivered this week, we finally had a chance to sit down and work on them.  

There is one thing about making bracelets for someone else -- they are tough to fit if you don't know the recipient's wrist circumference.  After some discussion, we decided to make a variety of sizes, and Mary will have the girls try them on and swap if they need to have a better fitting bracelet.  Also, making them using stretchy cord will help.
This size fits me -- and I have a large wrist!
Mary selected silver crosses and infinity symbols embedded with clear pave crystals.  Then she picked out tanzanite-colored Preciosa crystal beads to coordinate with the bridesmaids' dresses. Her flower girl's bracelet is in pink pave crystal with clear Swarovski crystal.  The bracelets were strung on .7mm Stretch Magic elastic cord.  I incorporated two silver-plated 4mm round beads to cover the knots.     

Together, I think Mary and I created a beautiful, D-I-Y gift that the girls will enjoy.  And we did it for about $4.15 each -- half the cost of purchasing them through Etsy.


That's D-I-Y done right!    

Tuesday, June 11, 2013

A One-of-a-kind Graduation Gift

Whew!  I was finally able to scratch something off of my 'to-do' list last night!!

At the beginning of May, a sewing client for whom I had previously made two t-shirt blankets called me to ask if I could make another.  Her oldest daughter is graduating from high school tomorrow, and she had been saving t-shirts from her daughter's teams, trips and favorite places for a while. She wanted them turned into a t-shirt blanket that can be used as a dorm bedspread next fall at Penn State.
Piles of t-shirts, waiting to be made into a blanket1
I've made a number of t-shirt blankets over the years, and I have it down to a science.  A smaller throw of 24 shirts (4 across and 6 down) takes me about 10 hours of work.  Of course, more shirts = more time.  Ellen had a pile of over 30 shirts, and she asked me to put a fleece border around the edges.  As we dug through the pile of tees, she pointed out those that were most important, and a few that I could utilize both the front and the back.

Some t-shirt quilt makers put fabric sashing between each block.  I prefer to sew 'shirt to shirt', cutting the blocks 12 1/2" square.  The blanket goes together quickly and makes for easier quilting.  I use polar fleece, sweatshirt fleece or soft 'minkee' fleece on the back, so I don't add batting between the layers.  This allows the quilting to be a bit more spread out than if I used batting.  I use Wrights double-fold fleece binding on the edges.
Pre-packaged binding makes finishing the blanket a breeze!
Of all of the tools in my sewing room, the one that really makes a difference on this project is my digital steam press.  The ironing surface is 9" by 22", and let's me fuse interfacing to the back of each t-shirt (to stablize it) in just two quick presses. What would take hours with a traditional iron takes just 50-60 minutes with the steam press.

My digital ironing press cost a little less than $100 on-line, but saves me hours of time!
So, after trimming, fusing and cutting down each block to 12 1/2", I lay them out into rows and sew them together.  Then I layer the backing fabric with the quilt top, and pin it all over with large safety pins. I use fabric marking pencils or chalk to draw my quilting lines.  Usually, I quilt an "X" through the center of each shirt.  Once the quilting is finished, I stitch around the edges of the quilt top, trim away the excess backing fabric, and apply the binding.

Ta-da!  Here's the finished product!

A one-of-a-kind graduation gift!
As I was preparing the invoice for Ellen, I did a little on-line research into what others charge for a custom made t-shirt quilt.  They range from $230 to $415 for a 24-shirt quilt.  For that size, I charge $200 for labor, plus the cost of materials, which can run up to $75.  Larger 35-shirt quilts run from $329 to $600.  My research gave me some great ideas on how price my work according to the number of shirts involved, as I realized it does take more time to prep and handle those additional 11 tees.
  
So, one thing has been scratched off my list...hoping to get two or three more finished by the weekend!

Happy sewing!


Sunday, June 2, 2013

Waltzing with Bears

When my children were little, we liked to sing and dance to "Waltzing with Bears," a funny little song by Seamus Kennedy.  He tells the tale about 'Old Uncle Walter' who slips out at night and goes dancing with 'raggy bears, shaggy bears, baggy bears, too.'  If you haven't heard it before, you can listen here:  http://www.musictory.com/music/Seamus+Kennedy/Waltzing+With+Bears

I spent last Saturday doing my own waltz with bears.
A teddy bear made by my friend Martha.
Vitas, a hospice located in Blue Bell, Pennsylvania, has asked members of my American Sewing Guild chapter to help with a special sewing project:  when a person in hospice care has died, the family can request that teddy bears be made from their loved one's clothing as a keepsake.  I've volunteered for this sewing service project a few times, and a group of us got together to sew over the weekend.

These teddies aren't hard to make.  We use a McCall's Crafts pattern by Carol's Zoo.  It has only two pattern pieces!

From cutting to sewing to stuffing, it takes no more than an hour and a half to complete a bear. We purchase  child-safe eyes and noses from Home Sew, a sewing and crafts supply company in Bethlehem, Pennsylvania (http://www.homesew.com).


Pinning the front to the back of the bear.


On this particular day, there were eight of us working on bears.  My hospice family wanted five bears, and provided two pairs of lounge pants and a shirt from which to make them.  We had enough fabric to cut out two small and three medium bears.


We got a good head start, but I did end of bringing them home to finish stuffing.

It's a simple project, and I'm happy that I can bring a little peace and comfort to someone who has lost a loved one.


ASG members hard at work at their machines.
I had an Uncle Walter when I was growing up...he died in 1978.  He was a professional photographer and I'm lucky to have some of his photos and a keepsake ring to remind me of him.


Hope you like raggy bears, shaggy bears and baggy bears, too!

P.S.  I've been working on about five things at once...my dress for my son's upcoming wedding, a gift for him and his future wife, a t-shirt quilt for a client, developing classes for the Bead Garden, and in the midst of all of this, my d.h. and I decided to totally re-do our bedroom!  Watch for future posts on these and other projects!